
Basic Concepts
What is C++?
Introduction
C++ is a general-purpose programming language.
C++ was derived from C, and is largely based on it.
Hello World!
Hello World
A C++ program is a collection of commands or statements.
#include <iostream>
using namespace std;
int main() {
    cout << "Hello World!";
    return 0;
}
#include <iostream>
- The number sign (#) at the beginning of a line targets the compiler’s pre-processor.
- #include tells the pre-processor to include the **
** header.
The **
The C++ compiler ignores blank lines.
Whitespace, such as spaces, tabs, and newlines, is also ignored, although it is used to enhance the program’s visual attractiveness.
In our code, the line using namespace std; tells the compiler to use the std (standard) namespace.
The std namespace includes features of the C++ Standard Library.
Main
Program execution begins with the main function, int main().
Curly brackets { } indicate the beginning and end of a function, which can also be called the function’s body.
The entry point of every C++ program is main(), irrespective of what the program does.
The next line, cout « “Hello world!”; results in the display of “Hello world!” to the screen.
In C++, streams are used to perform input and output operations.
In most program environments, the standard default output destination is the screen. In C++, cout is the stream object used to access it.
cout is used in combination with the insertion operator. Write the insertion operator as « to insert the data that comes after it into the stream that comes before.
In C++, the semicolon is used to terminate a statement. Each statement must end with a semicolon. It indicates the end of one logical expression.
Cout (pronounced “see-out”). == common output
cout is a predefined variable in C++ that indicates you are going to output a stream of characters to an output device. cout uses an operator called the insertion operator («).
cout << "hello world";

~~

print("Helloworld")
Statements
A block is a set of logically connected statements, surrounded by opening and closing curly braces.
{
  cout << "Hello world!";
  return 0;
}
Return
The line return 0; terminates the main() function and causes it to return the value 0 to the calling process.
A non-zero value (usually of 1) signals abnormal termination.
Getting the tools
Getting the tools
- Integrated Development Environment (IDE): Provides tools for writing source code. Any text editor can be used as an IDE.
- Compiler: Compiles source code into the final executable program. There are a number of C++ compilers available. The most frequently used and free available compiler is the GNU C/C++ compiler.
Printing a Text
First program
You can add multiple insertion operators after cout.
#include <iostream>
using namespace std;
int main() {
    cout << "Hello World!" << "\n" << "This is awesome";
    return 0;
}
Hello World!
This is awesome
Process finished with exit code 0
New line
The cout object does not insert a line break at the end of the output.
- One way to print two lines is to use the endl manipulator, which will put in a line break.
#include <iostream>
using namespace std;
int main() {
    cout << "Hello World!\n";
    cout << "I Love programming!";
    return 0;
}
Hello World!
I Love programming!
Process finished with exit code 0
The endl manipulator moves down to a new line to print the second text.
- The new line character \n can be used as an alternative to endl.
The backslash () is called an escape character, and indicates a “special” character.
#include <iostream>
using namespace std;
int main() {
    cout << "Hello World!\n";
    cout << "I Love programming!";
    return 0;
}
Two newline characters placed together result in a blank line.
#include <iostream>
using namespace std;
int main() {
    cout << "Hello World!\n\n" << endl;
    cout << "I Love programming!";
    return 0;
}
Hello World!


I Love programming!
Process finished with exit code 0
Multiple New Lines
Using a single cout statement with as many instances of \n as your program requires will print out multiple lines of text.
#include <iostream>
using namespace std;
int main() {
    cout << "Hello\n World!\n\n" << endl;
    cout << "I\n Love programming!";
    return 0;
}
Hello
 World!


I
 Love programming!
Process finished with exit code 0
Comments
- single line comments //
- multi line comments /* */
Variables
Creating a variable reserves a memory location, or a space in memory for storing values.
Reserve 储备

The compiler requires that you provide a data type for each variable you declare.
You reserve a room, room for a kid or an adult, for a man or for a dog, that’s the type.
C++ requires that you specify the type and the identifier for each variable defined.
Indentifier is the name or the label, that we may have several dogs but with different name so that we can differ them.
int myVariable = 10;
#include <iostream>
using namespace std;


int main(){
    int myVar = 10;
    cout << myVar;
    return 0;
}
/Users/azat/Developer/SoloCPP/cmake-build-debug/SoloCPP
10
Process finished with exit code 0
The C++ programming language is case-sensitive, so myVariable and myvariable are two different identifiers.
#include <iostream>

using namespace std;


int main() {
    int a = 30;
    int b = 12;
    int sum = a + b;
    cout << sum;
    return 0;
}
Working with Variables
Declaring Variables
int a; a=4;int a=5
User Input
To enable the user to input a value, use cin in combination with the extraction operator (»). The variable containing the extracted data follows the operator.
#include <iostream>

using namespace std;


int main() {
    int a;
    int b;
    cin >> a >> b;
    int sum = a + b;
    cout << sum;
    return 0;
}
3 5
8
Process finished with exit code 0
As with cout, extractions on cin can be chained to request more than one input in a single statement: cin » a » b;
Variable Types
Specifying the data type is required just once, at the time when the variable is declared. After that, the variable may be used without referring to the data type.
A variable’s value may be changed as many times as necessary throughout the program.
Basic Arithmetic
Arithmetic Operators
C++ supports these arithmetic operators.
| Operator | Symbol | Form |
|---|---|---|
| Addition | + | x + y |
| Subtraction | - | x - y |
| Multiplication | * | x * y |
| Division | / | x / y |
| Modulus | % | x % y |
Assignment and Increment Operators
Assignment Operators
The simple assignment operator (=) assigns the right side to the left side.
x += 4; // equivalent to x = x + 4
x -= 5; // equivalent to x = x - 5
Increment Operator
++x; // prefix
x++; // postfix

x = 5;
y = ++x;
// x is 6, y is 6

x = 5;
y = x++;
// x is 6, y is 5
Conditionals and Loops
The if Statement
Decision Making
The if statement is used to execute some code if a condition is true.
if (condition) {
   statements
}
Relational Operators
| Operator | Example |
|---|---|
| > | 7>4 True |
| >= | 7>=4 True |
| < | 4<5 True |
| <= | 4<=5 True |
| == | 7!=4 True |
The else Statement
else Statement
An if statement can be followed by an optional else statement, which executes when the condition is false.
if (condition){
  //statements
}
else {
  //statements
}
Nested if Statement
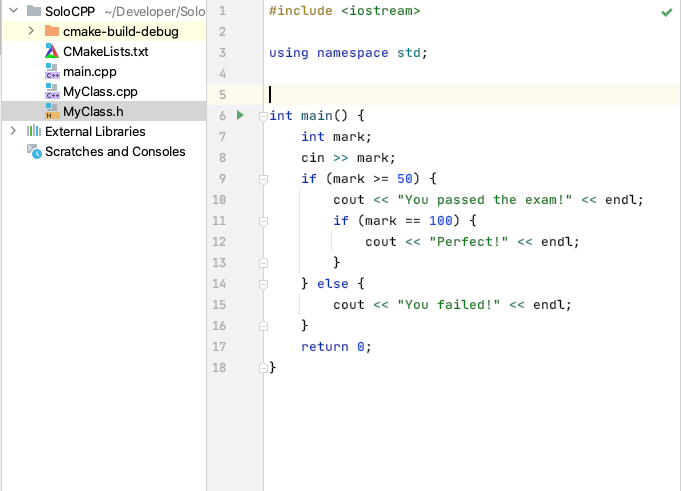
#include <iostream>

using namespace std;


int main() {
    int mark;
    cin >> mark;
    if (mark >= 50) {
        cout << "You passed the exam!" << endl;
        if (mark == 100) {
            cout << "Perfect!" << endl;
        }
    } else {
        cout << "You failed!" << endl;
    }
    return 0;
}
99
You passed the exam!

Process finished with exit code 0
The while Loop
Loops
A loop repeatedly executes a set of statements until a particular condition is satisfied.
while Loop
while (condition){
  //statements;
}
The for Loop
for Loop
A for loop is a repetition control structure that allows you to efficiently write a loop that executes a specific number of times.
for (int;condition;increment){
  //statements
}
The do…while Loop
do…while
the do…while loop checks its condition at the bottom of the loop.
do {
  //statements
} while (condition);
The switch Statement
Multiple Conditions
Sometimes there is a need to test a variable for equality against multiple values. That can be achieved using multiple if statements.
int age = 42;
if (age == 16) {
  cout <<"Too young";
}
if (age == 42) {
  cout << "Adult";
}
if (age == 70) {
  cout << "Senior";
}
The switch Statement
switch (expresion) {
  case value1:
    //statements
    break;
  case value2:
    //statements
    break;
    ....
  case valuen:
   //statements
   break;
}
The default case
int age = 25;
switch (age) {
  case 16:
    cout << "Too young";
    break;
  case 42:
    cout << "Adult";
    break;
  case 70:
    cout << "Senior";
    break;
  default:
    cout << "This is the default case";
}

// Outputs "This is the default case"
The break Statement
The break statement’s role is to terminate the switch statement.
As the switch statement’s final case, the default case requires no break statement.
Logical Operators
Logical Operators
| Operator | Name of Operator | Form |
|---|---|---|
| && | AND | y&&x |
| || | OR | y||X |
| ! | NOT | !x |
Data Types, Arrays, Pointers
Introduction to Datatypes
Data Types
The operating system allocates memory and selects what will be stored in the reserved memory based on the variable’s data type.
Expressions
The examples below show legal and illegal C++ expressions.
55+15 //  legal C++ expression
//Both operands of the + operator are integers

55 + "John" // illegal
// The + operator is not defined for integer and string
Numeric Data Types
- Integers (Whole Numbers)
- Floating Point
String and Characters
A string is composed of numbers, characters, or symbols.
Characters are single letters or symbols, and must be enclosed between single quotes, like ‘a’, ‘b’, etc.
In C++, single quotation marks indicate a character; double quotes create a string literal. While ‘a’ is a single a character literal, “a” is a string literal.
Booleans
- true 1
- false 0
int, float, double
integers
The integer type holds non-fractional numbers, which can be positive or negative.
The size of the integer type varies according to the architecture of the system on which the program runs, although 4 bytes is the minimum size in most modern system architectures.
Use the int keyword to define the integer data type.
int a=42;
- signed: A signed integer can hold both negative and positive numbers.
- unsigned: An unsigned integer can hold only positive values.
- short: Half of the default size.
- long: Twice the default size.
Floating Point Numbers
A floating point type variable can hold a real number, such as 420.0, -3.33, or 0.03325.
a varying number of digits can appear before and after the decimal point.
You could say that the decimal has the ability to “float”.
There are three different floating point data types: float, double, and long double.
- float. 4 byte
- double. 8 byte
- long double. (8or) 16
double 4.21;
Floating point data types are always signed, which means that they have the capability to hold both positive and negative values.
string, char, bool
A string is an ordered sequence of characters, enclosed in double quotation marks.
You need to include the **
#include <iostream>
// #include <string>
using namespace std;

int main() {
    string a="I am learning c++";
    std::cout << a << std::endl;
    return 0;
}
I am learning c++

Process finished with exit code 0
The
library is included in the library, so you don't need to include separately, if you already use .
Characters
A char variable holds a 1-byte integer. However, instead of interpreting the value of the char as an integer, the value of a char variable is typically interpreted as an ASCII character.
A character is enclosed between single quotes (such as ‘a’, ‘b’, etc).
char test = ‘S’;`
American Standard Code for Information Interchange (ASCII) is a character-encoding scheme that is used to represent text in computers.
Booleans
Boolean variables only have two possible values: true (1) and false (0).
To declare a boolean variable, we use the keyword bool.
bool online = false;
bool logged_in = true;
If a Boolean value is assigned to an integer, true becomes 1 and false becomes 0. If an integer value is assigned to a Boolean, 0 becomes false and any value that has a non-zero value becomes true.
Variable Naming Rules
Variable Naming Rules
- All variable names must begin with a letter of the alphabet or an underscore( _ ).
- After the initial letter, variable names can contain additional letters, as well as numbers. Blank spaces or special characters are not allowed in variable names.
- C++ keyword (reserved word) cannot be used as variable names.
There is no real limit on the length of the variable name (depends on the environment), but try to keep your variable names practical and meaningful.
There are two known naming conventions: Pascal case: The first letter in the identifier and the first letter of each subsequent concatenated word are capitalized. For example: BackColor Camel case: The first letter of an identifier is lowercase and the first letter of each subsequent concatenated word is capitalized. For example: backColor
Case Sensitivity
C++ is case-sensitive,
Arrays
Arrays
An array is used to store a collection of data, but it may be useful to think of an array as a collection of variables that are all of the same type.
Instead of declaring multiple variables and storing individual values, you can declare a single array to store all the values.
int a[5];
int b[5] = {11,45,62,70,88};
The values are provided in a comma separated list, enclosed in {curly braces}.
The number of values between braces { } must not exceed the number of the elements declared within the square brackets [ ].
Initializing Arrays
If you omit the size of the array, an array just big enough to hold the initialization is created.
int b[]={11,45,62,70,88};
Each element, or member, of the array has an index, which pinpoints the element’s specific position. The array’s first member has the index of 0, the second has the index of 1. So, for the array b that we declared above:

To access array elements, index the array name by placing the element’s index in square brackets following the array name.
int b[] = {11, 45, 62, 70, 88};

cout << b[0] << endl;
// Outputs 11

cout<< b[3] << endl;
// Outputs 70
Accessing Array Elements
Index numbers may also be used to assign a new value to an element.
int b[] = {11, 45, 62, 70, 88};
b[2] = 42;
Using Arrays in Loops
Arrays in Loops
It’s occasionally necessary to iterate over the elements of an array, assigning the elements values based on certain calculations.
#include <iostream>
#include <string>
using namespace std;

int main() {
    string a="I am learning c++";
    std::cout << a << std::endl;
    int arr[5];
    for (int i = 0; i <sizeof(arr) ; ++i) {
        arr[i]=42;
    }
    return 0;
}
I am learning c++

Process finished with exit code 6
#include <iostream>
#include <string>
using namespace std;

int main() {
    string a="I am learning c++";
    std::cout << a << std::endl;
    int arr[5];
    for (int & i : arr) {
        i=42;
    }
    for (int i : arr) {
        cout << i <<endl;
    }
    return 0;
}
The syntax is new here: it’s called range based loop.
Syntax :
attr(optional) for ( range_declaration : range_expression ) loop_statement


attr	-	any number of attributes
range_declaration	-	a declaration of a named variable, whose type is the type of the element of the sequence represented by range_expression, or a reference to that type. Often uses the auto specifier for automatic type deduction

range_expression	-	any expression that represents a suitable sequence (either an array or an object for which begin and end member functions or free functions are defined, see below) or a braced-init-list.

loop_statement	-	any statement, typically a compound statement, which is the body of the loop

range_declaration may be a structured binding declaration
Arrays in Calculation
Arrays in Calculation
The following code creates a program that uses a for loop to calculate the sum of all elements of an array.
#include <iostream>
using namespace std;

int main() {
    int arr[]={11,35,62,555,989};
    int sum=0;
    for (int i = 0; i < 5; ++i) {
        sum+=arr[i];
    }
    cout << sum << endl;
    return 0;
}
1652

Process finished with exit code 0
Multi-Dimensional Arrays
Multi-Dimensional Arrays
A multi-dimensional array holds one or more arrays. Declare a multidimensional array as follows.
type name[size1][size2]....[sizeN]
Here, we’ve created a two-dimensional 3x4 integer array:
int x[3][4]; // row column
Visualize this array as a table composed of 3 rows, and 4 columns.

Arrays can contain an unlimited number of dimensions.
Two-Dimensional Arrays
Multi-dimensional arrays may be initialized by specifying bracketed values for each row. Following is an array with 2 rows and 3 columns:
or
Introduction to Pointers
Pointers
Every variable is a memory location, which has its address defined.
That address can be accessed using the ampersand (&) operator (also called the address-of operator), which denotes an address in memory.
A pointer is a variable, with the address of another variable as its value.
In C++, pointers help make certain tasks easier to perform. Other tasks, such as dynamic memory allocation, cannot be performed without using pointers.
All pointers share the same data type - a long hexadecimal number that represents a memory address.
The only difference between pointers of different data types is the data type of the variable that the pointer points to.
A pointer is a variable, and like any other variable, it must be declared before you can work with it.
The asterisk sign is used to declare a pointer (the same asterisk that you use for multiplication), however, in this statement the asterisk is being used to designate a variable as a pointer.
#include <iostream>

using namespace std;

int main() {
    int *ip;  // pointer to an integer
    double *dp;   // pointer to a double
    float *fp;  // pointer to a float
    char *ch;  // pointer to a character
    return 0;
}
Just like with variables, we give the pointers a name and define the type, to which the pointer points to.
The asterisk sign can be placed next to the data type, or the variable name, or in the middle.
Using Pointers
#include <iostream>

using namespace std;

int main() {
    int score = 5;
    int *scorePtr;
    scorePtr = &score;
    cout << score << endl;
    cout << scorePtr << endl;
    return 0;
}
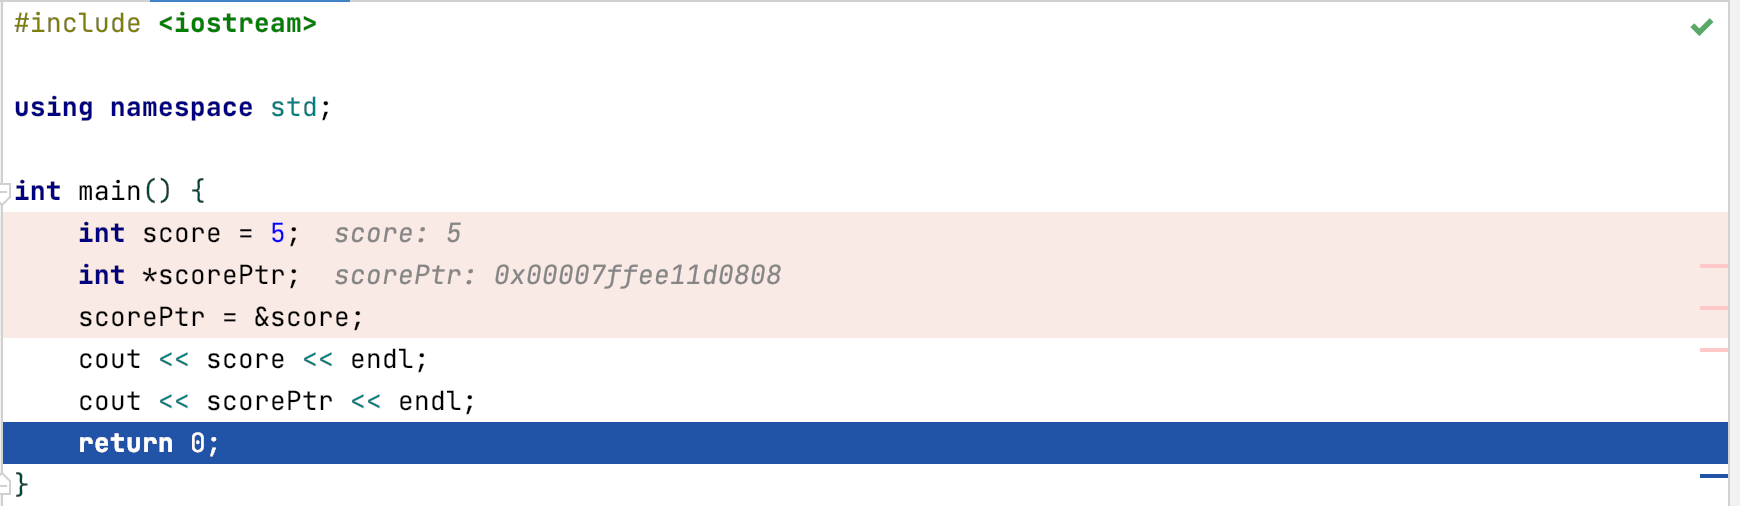

Now, scorePtr’s value is the memory location of score.
More on Pointers
Pointer Operations
There are two operators for pointers:
- Address-of operator (&): returns the memory address of its operand.*
- Contents-of (or dereference) operator (*): returns the value of the variable located at the address specified by its operand.
#include <iostream>

using namespace std;

int main() {
    int var = 50;
    int *p;
    p = &var;
    cout << var << endl;
    cout << p << endl;
    cout << *p << endl;
    cout << *&var << endl;
    return 0;
}
50
0x7ffeed3cd828
50
50

Process finished with exit code 0
- & is the address
*is the content
So:
p is the address of var
*p is the value of p , or value of &var
means get the value of the memory address.
if p is defined as *p (means p is a pointer), then :
pis the address*pis the value of the pointed address
Dereferencing
#include <iostream>

using namespace std;

int main() {
    int x = 5;
    int *p = &x;
    x = x + 4;
    x = *p + 4;
    *p = *p + 4;
    return 0;
}

As p is pointing to the variable x, dereferencing the pointer (*p) is representing exactly the same as the variable x.
the *p==x.
because the p is the address of the x and *p is the value in the address. and x is also the address of the x’s value.
Dynamic Memory
Static & Dynamic Memory
To be successful as a C++ programmer, it’s essential to have a good understanding of how dynamic memory works.
In a C++ program, memory is divided into two parts:
- The stack: All of your local variables take up memory from the stack.
- The heap: Unused program memory that can be used when the program runs to dynamically allocate the memory.
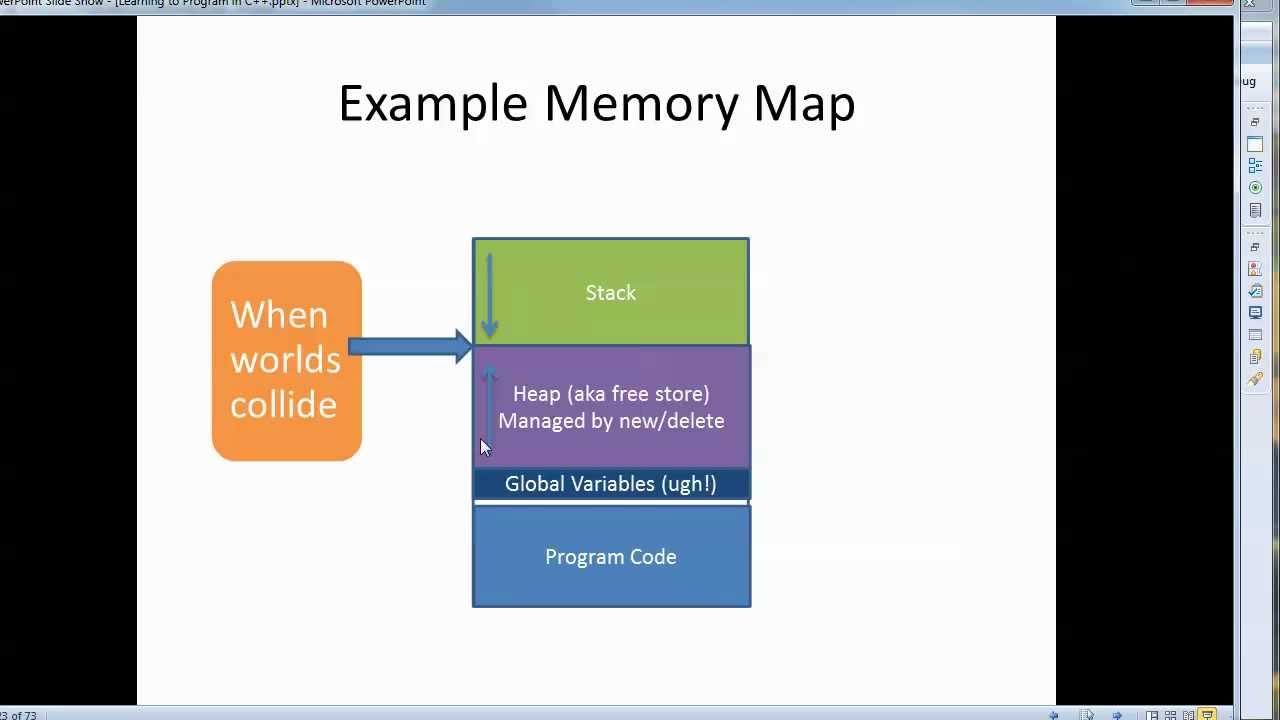
Many times, you are not aware in advance how much memory you will need to store particular information in a defined variable and the size of required memory can be determined at run time. You can allocate memory at run time within the heap for the variable of a given type using the new operator, which returns the address of the space allocated.
new int;
This allocates the memory size necessary for storing an integer on the heap, and returns that address.
Dynmaic Memory
The allocated address can be stored in a pointer, which can then be dereferenced to access the variable.
int *p=new int;
*p=5;
We have dynamically allocated memory for an integer, and assigned it a value of 5.
The pointer p is stored in the stack as a local variable, and holds the heap’s allocated address as its value. The value of 5 is stored at that address in the heap.
For local variables on the stack, managing memory is carried out automatically.
On the heap, it’s necessary to manually handle the dynamically allocated memory, and use the delete operator to free up the memory when it’s no longer needed.
delete pointer;
This statement releases the memory pointed to by pointer
#include <iostream>

using namespace std;

int main() {
    int *p = new int;// request memory
    *p = 5; // store value
    cout << *p << endl; // use value
    delete p;// free the memory
    return 0;
}
5

Process finished with exit code 0
Dangling Pointers
The delete operator frees up the memory allocated for the variable, but does not delete the pointer itself, as the pointer is stored on the stack.
Pointers that are left pointing to non-existent memory locations are called dangling pointers. For example:
#include <iostream>

using namespace std;

int main() {
    int *p = new int;// request memory
    *p = 5; // store value
    cout << *p << endl; // use value
    delete p;// free the memory
    p = new int; // reuse for a new address
    return 0;
}
The NULL pointer is a constant with a value of zero that is defined in several of the standard libraries, including iostream. It’s a good practice to assign NULL to a pointer variable when you declare it, in case you do not have exact address to be assigned. A pointer assigned NULL is called a null pointer. For example: int *ptr = NULL;
#include <iostream>

using namespace std;

int main() {
    int *p = NULL; // Pointer initialized with null
    p = new int[20]; // Request memory
    delete p;// free the memory
    p = new int; // reuse for a new address
    return 0;
}
Dynamic memory allocation is useful in many situations, such as when your program depends on input. As an example, when your program needs to read an image file, it doesn’t know in advance the size of the image file and the memory necessary to store the image.
The sizeof() Operator
sizeof
While the size allocated for varying data types depends on the architecture of the computer you use to run your programs, C++ does guarantee a minimum size for the basic data types:
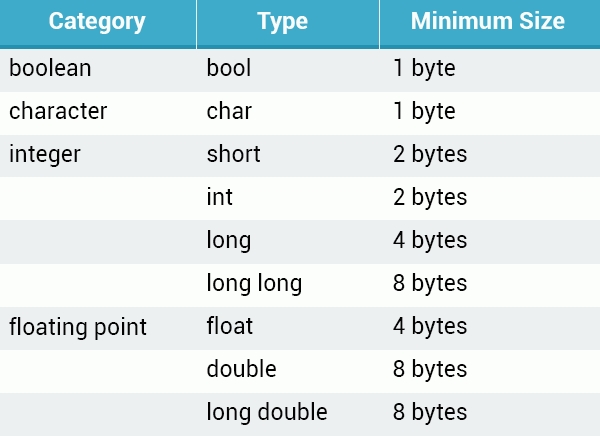
The sizeof operator can be used to get a variable or data type’s size, in bytes.
sizeof(data type);
The sizeof operator determines and returns the size of either a type or a variable in bytes.
#include <iostream>

using namespace std;

int main() {
    int *p = NULL; // Pointer initialized with null
    p = new int[20]; // Request memory
    delete p;// free the memory
    cout << "char: " << sizeof(char) << endl;
    cout << "int: " << sizeof(int) << endl;
    cout << "float: " << sizeof(float) << endl;
    cout << "double: " << sizeof(double) << endl;
    int var = 50;
    cout << "var: " << sizeof(var) << endl;
    return 0;
}
char: 1
int: 4
float: 4
double: 8
var: 4

Process finished with exit code 0
Size of an Array
The C++ sizeof operator is also used to determine the size of an array.
double myArr[10];
cout << sizeof(myArr) <<endl;
On our machine, double takes 8 bytes. The array stores 10 doubles, so the entire array occupies 80 (8*10) bytes in the memory.
int numbers[100];
cout << sizeof(numbers) / sizeof(numbers[0]);
Functions
Introduction to Functions
Functions
A function is a group of statements that perform a particular task.
Using functions can have many advantages, including the following:
- You can reuse the code within a function.
- You can easily test individual functions.
- If it’s necessary to make any code modifications, you can make modifications within a single function, without altering the program structure.
- You can use the same function for different inputs.
The Return Type
int main()
{
  // some code
  return 0;
}
A function’s return type is declared before its name. In the example above, the return type is int, which indicates that the function returns an integer value.
Occasionally, a function will perform the desired operations without returning a value. Such functions are defined with the keyword void.
void is a basic data type that defines a valueless state.
Defining a Function
Define a C++ function using the following syntax:
return_type function_name (parameter list)
{
  body of the function
}
- return-type: Data type of the value returned by the function.
- function name: Name of the function.
- parameters: When a function is invoked, you pass a value to the parameter. This value is referred to as actual parameter or argument. The parameter list refers to the type, order, and number of the parameters of a function.
- type
- order
- number
- body of the function: A collection of statements defining what the function does.
Parameters are optional; that is, you can have a function with no parameters.
Functions
You must declare a function prior to calling it. For example:
#include <iostream>

using namespace std;


void printSomeThing() {
    cout << "Hi, there?" << endl;
}

int main() {
    printSomeThing();
    return 0;
}
A function declaration, or function prototype, tells the compiler about a function name and how to call the function. The actual body of the function can be defined separately.
#include <iostream>

using namespace std;


// Function declaration (or function prototype)
void printSomeThing();

int main() {
    printSomeThing();
    return 0;
}

//Function definition
void printSomeThing() {
    cout << "Hi, there?" << endl;
}
Function Parameters
Function Parameters
For a function to use arguments, it must declare formal parameters, which are variables that accept the argument’s values.
#include <iostream>

using namespace std;


// Function declaration (or function prototype)
void printSomeThing(int x);

int main() {
    printSomeThing(5);
    return 0;
}

//Function definition
void printSomeThing(int x) {
    cout << x << endl;
}
5

Process finished with exit code 0
This defines a function that takes one integer parameter and prints its value.
Formal parameters behave within the function similarly to other local variables. They are created upon entering the function, and are destroyed upon exiting the function.
Once parameters have been defined, you can pass the corresponding arguments when the function is called.
Making changes to the parameter within the function does not alter the argument.
Argument is something you provide, parameter is something hold data within the function or object.
Functions with Multiple Parameters
Multiple Parameters
You can define as many parameters as you want for your functions, by separating them with commas.
int addNumbers(int x, int y){
  //
}
Data type and name should be defined for each parameter
int addNumbers(int x, int y){
  int result = x+y;
  return result;
}
#include <iostream>

using namespace std;


// Function declaration (or function prototype)
int addNumbers(int x, int y);

int main() {
    cout << addNumbers(4, 5);
    return 0;
}

//Function definition
int addNumbers(int x, int y) {
    int result = x + y;
    return result;
}
9
Process finished with exit code 0
The rand() Function
Random Numbers
Being able to generate random numbers is helpful in a number of situations, including when creating games, statistical modeling programs, and similar end products.
In the C++ standard library, you can access a pseudo random number generator function that’s called rand(). When used, we are required to include the header **

#include <iostream>
#include <cstdlib>

using namespace std;

int main() {
    cout << rand();
}
16807
Process finished with exit code 0
Clang-Tidy: Rand() has limited randomness; use C++11 random library instead
Cstdlib — means C (refers to the C language) standard (std) library.
This header was originally in the C standard library as **<stdlib.h>**.
This header defines several general purpose functions, including dynamic memory management, random number generation, communication with the environment, integer arithmetics, searching, sorting and converting.
Random Numbers
A for loop can be used to generate multiple random numbers.
#include <iostream>
#include <cstdlib>

using namespace std;

int main() {
    for (int i = 0; i <= 10; ++i) {
        cout << rand() << endl;
    }

}
16807
282475249
1622650073
984943658
1144108930
470211272
101027544
1457850878
1458777923
2007237709
823564440
Use the modulo (%) operator to generate random numbers within a specific range. The example below generates whole numbers within a range of 1 to 6.
#include <iostream>
#include <cstdlib>

using namespace std;

int main() {
    for (int i = 0; i <= 10; ++i) {
        cout << 1 + rand() % 6 << endl;
    }

}
2
2
6
3
5
3
1
3
6
2
1

Process finished with exit code 0
However, the rand() function will only return a pseudo random number. This means that each time the code is run, it generates the same numbers.
Pseudo : 冒充的 欺人者 ложный фальшивый обманщик
The stand() Function
The srand() function is used to generate truly random numbers.
This function allows to specify a seed value as its parameter, which is used for the rand() function’s algorithm.
The C library function void srand(unsigned int seed) seeds the random number generator used by the function rand.
void srand(unsigned int seed)
#include <iostream>
#include <cstdlib>

using namespace std;

int main() {
    srand(98);
    for (int i = 0; i <= 10; ++i) {
        cout << 1 + rand() % 6 << endl;
    }

}
3
3
3
3
5
2
3
5
5
2
6

Process finished with exit code 0
#include <iostream>
#include <cstdlib>

using namespace std;

int main() {
    srand(99); // changed to 99
    for (int i = 0; i <= 10; ++i) {
        cout << 1 + rand() % 6 << endl;
    }

}
4
3
2
4
3
4
3
6
3
2
6

Process finished with exit code 0
Changing the seed value changes the return of rand(). However, the same argument will result in the same output.
Truly Random Numbers
A solution to generate truly random numbers, is to use the current time as a seed value for the srand() function.
This example makes use of the time() function to get the number of seconds on your system time, and randomly seed the rand() function (we need to include the **
#include <iostream>
#include <cstdlib>
#include <ctime>

using namespace std;

int main() {
    cout << time(0) << endl;
    srand(time(0));
    for (int i = 0; i <= 10; ++i) {
        cout << 1 + rand() % 6 << endl;
    }

}
1598602952
2
3
3
5
3
2
1
3
6
5
4

Process finished with exit code 0
time(0) will return the current second count, prompting the srand() function to set a different seed for the rand() function each time the program runs.
Default Arguments
Default values for Parameters
When defining a function, you can specify a default value for each of the last parameters. If the corresponding argument is missing when you call a function, it uses the default value.
int sum(int a,int b=42){
  int result = a+b;
  return (result);
}
Function Overloading
Function overloading allows to create multiple functions with the same name, so long as they have different parameters.
For example, you might need a printNumber() function that prints the value of its parameter.
void printNumber(int a){
  cout << a;
}
This is effective with integer arguments only. Overloading it will make it available for other types, such as floats.
void printNumber(float a){
  cout << a;
}
Now, the same printNumber() function name will work for both integers and floats.
When overloading functions, the definition of the function must differ from each other by the types and/or the number of arguments in the argument list.
#include <iostream>
#include <cstdlib>
#include <ctime>

using namespace std;

void printNumber(int x){
    cout << "Prints an integer." << x <<endl;
}
void printNumber(float x){
    cout << "Prints an float." << x << endl;
}
int main() {
    int a=16;
    float b=54.541;
    printNumber(a);
    printNumber(b);
}
Prints an integer.16
Prints an float.54.541

Process finished with exit code 0
As you can see, the function call is based on the argument provided. An integer argument will call the function implementation that takes an integer parameter. A float argument will call the implementation taking a float parameter.
You can not overload function declarations that differ only by return type. The following declaration results in an error.
Although each function uses the same name, the only difference from one to the other is the return type, which is not allowed.
Recursion
Recursion
A recursive function in C++ is a function that calls itself.
In mathematics, the term factorial refers to the product of all positive integers that are less than or equal to a specific non-negative integer (n). The factorial of n is denoted as n!
4!=4*3*2*1=24
#include <iostream>
#include <cstdlib>
#include <ctime>

using namespace std;

int factorial(int n) {
    if (n == 1) {
        return 1;
    } else {
        return n * factorial(n - 1);
    }
}

int main() {
    int a = 16;
    cout << factorial(16);
}
2004189184
Process finished with exit code 0
The factorial function calls itself, and then continues to do so, until the argument equals 1.
Passing Arrays to Function
Arrays and Functions
An array can also be passed to a function as an argument.
The parameter should be defined as an array using square brackets, when declaring the function. For example:
#include <iostream>
#include <cstdlib>
#include <ctime>

using namespace std;

int factorial(int n) {
    if (n == 1) {
        return 1;
    } else {
        return n * factorial(n - 1);
    }
}

void printArray(int arr[],int size){
    for (int i = 0; i <size ; ++i) {
        cout << factorial(arr[i])<<endl;
    }
}

int main() {
    int myArr[3]={2,3,4};
    printArray(myArr,3);
}
2
6
24

Process finished with exit code 0
Pass by Reference with Pointers
Function Arguments
There are two ways to pass arguments to a function as the function is being called.
- By value: This method copies the argument’s actual value into the function’s formal parameter. Here, we can make changes to the parameter within the function without having any effect on the argument.
- By reference: This method copies the argument’s reference into the formal parameter. Within the function, the reference is used to access the actual argument used in the call. This means that any change made to the parameter affects the argument.
By default, C++ uses call by value to pass arguments.
Passing by Value
By default, arguments in C++ are passed by value. When passed by value, a copy of the argument is passed to the function.
#include <iostream>
#include <cstdlib>
#include <ctime>

using namespace std;

int factorial(int n) {
    if (n == 1) {
        return 1;
    } else {
        return n * factorial(n - 1);
    }
}

void printArray(int arr[], int size) {
    for (int i = 0; i < size; ++i) {
        cout << factorial(arr[i]) << endl;
    }
}

void myFunc(int x) {
    x = 100;
}

int main() {
    int myArr[3] = {2, 3, 4};
    printArray(myArr, 3);
    int var = 20;
    myFunc(var);
    cout << var << endl;
}
2
6
24
20

Process finished with exit code 0
Because a copy of the argument is passed to the function, the original argument is not modified by the function.
Passing by Reference
Pass-by-reference copies an argument’s address into the formal parameter. Inside the function, the address is used to access the actual argument used in the call. This means that changes made to the parameter affect the argument.
To pass the value by reference, argument pointers are passed to the functions just like any other value.
#include <iostream>
#include <cstdlib>
#include <ctime>

using namespace std;

int factorial(int n) {
    if (n == 1) {
        return 1;
    } else {
        return n * factorial(n - 1);
    }
}

void printArray(int arr[], int size) {
    for (int i = 0; i < size; ++i) {
        cout << factorial(arr[i]) << endl;
    }
}

void myFunc(int x) {
    x = 100;
}

void passArg(int *x) { // x is a pointer and x=&var, *x = var (the original var)
    *x = 100; // here we defined a pointer.
}

int main() {
    int myArr[3] = {2, 3, 4};
    printArray(myArr, 3);
    int var = 20;
    myFunc(var);
    cout << var << endl;
    passArg(&var);
    cout << var << endl;
}
2
6
24
20
100

Process finished with exit code 0
As you can see, we passed the variable directly to the function using the address-of operator &. The function declaration says that the function takes a pointer as its parameter (defined using the * operator).
As a result, the function has actually changed the argument’s value, as accessed it via the pointer.
Summary
In general, passing by value is faster and more effective. Pass by reference when your function needs to modify the argument, or when you need to pass a data type, that uses a lot of memory and is expensive to copy.
Classes and Objects
What is an Object
What is an Object
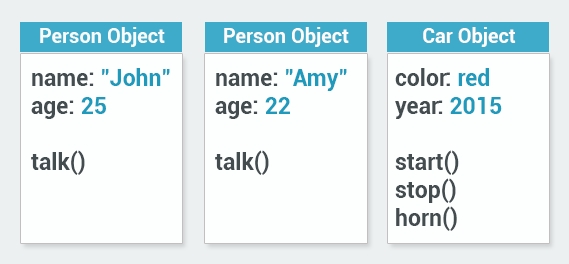
Object Oriented Programming is a programming style that is intended to make thinking about programming closer to thinking about the real world.
In programming, objects are independent units, and each has its own identity, just as objects in the real world do.
An apple is an object; so is a mug. Each has its unique identity. It’s possible to have two mugs that look identical, but they are still separate, unique objects.
Objects
An object might contain other objects but they’re still different objects.
Objects also have characteristics that are used to describe them. For example, a car can be red or blue, a mug can be full or empty, and so on. These characteristics are also called attributes. An attribute describes the current state of an object. Objects can have multiple attributes (the mug can be empty, red and large).
An object’s state is independent of its type; a cup might be full of water, another might be empty.
In the real world, each object behaves in its own way. The car moves, the phone rings, and so on. The same applies to objects - behavior is specific to the object’s type.
So, the following three dimensions describe any object in object oriented programming: identity, attributes, behavior.
graph LR
	A["Object"] --> B & C & D
	B["identity"] --- F["Unique"]
	C["attributes"]	--- G["state of the object"]
	D["behavior"] --- H["what they can do?"]
In programming, an object is self-contained, with its own identity. It is separate from other objects.
Each object has its own attributes, which describe its current state. Each exhibits its own behavior, which demonstrates what they can do.
Horn:

In computing, objects aren’t always representative of physical items. For example, a programming object can represent a date, a time, a bank account. A bank account is not tangible; you can’t see it or touch it, but it’s still a well-defined object - it has its own identity, attributes, and behavior.
tangible : 有形 现实 ощутимый осязаемый
What is a class
What is a class
Objects are created using classes, which are actually the focal point of OOP.
The class describes what the object will be, but is separate from the object itself.
In other words, a class can be described as an object’s blueprint, description, or definition.
|  |
You can use the same class as a blueprint for creating multiple different objects. For example, in preparation to creating a new building, the architect creates a blueprint, which is used as a basis for actually building the structure. That same blueprint can be used to create multiple buildings.
Programming works in the same fashion. We first define a class, which becomes the blueprint for creating objects.
Each class has a name, and describes attributes and behavior.
Methods
Method is another term for a class’ behavior. A method is basically a function that belongs to a class.
Methods are similar to functions - they are blocks of code that are called, and they can also perform actions and return values.
Example Class
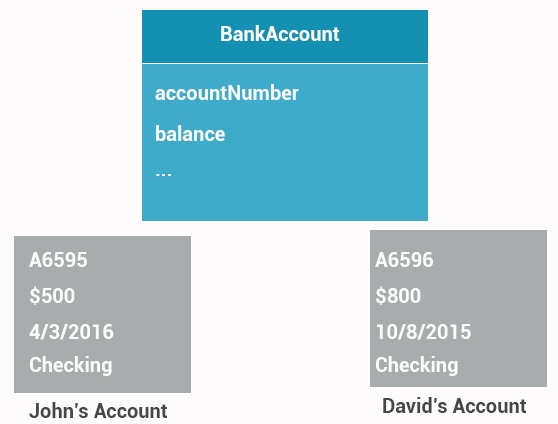
For example, if we are creating a banking program, we can give our class the following characteristics:
- name: BankAccount
- attributes: accountNumber, balance, dateOpened
- behavior: open(), close(), deposit()
The class specifies that each object should have the defined attributes and behavior. However, it doesn’t specify what the actual data is; it only provides a definition.
Once we’ve written the class, we can move on to create objects that are based on that class. Each object is called an instance of a class. The process of creating objects is called instantiation.
Example of a Class
Declaring a Class
Begin your class definition with the keyword class. Follow the keyword with the class name and the class body, enclosed in a set of curly braces.
class BankAccount{

};
A class definition must be followed by a semicolon.
Define all attributes and behavior (or members) in the body of the class, within curly braces.
You can also define an access specifier for members of the class.
A member that has been defined using the public keyword can be accessed from outside the class, as long as it’s anywhere within the scope of the class object.
You can also designate a class’ members as private or protected. This will be discussed in greater detail later in the course.
Creating a Class
#include <iostream>

using namespace std;


class BankAccount {
public:
    void sayHi() {
        cout << "hi" << endl;
    }
};

int main(){
    BankAccount test;
    test.sayHi();
}
hi

Process finished with exit code 0
Our object named test has all the members of the class defined.
Notice the dot separator (.) that is used to access and call the method of the object.
We must declare a class before using it, as we do with functions.
Abstraction
Abstraction
Data abstraction is the concept of providing only essential information to the outside world. It’s a process of representing essential features without including implementation details.
A good real-world example is a book: When you hear the term book, you don’t know the exact specifics, i.e.: the page count, the color, the size, but you understand the idea of a book - the abstraction of the book.
The concept of abstraction is that we focus on essential qualities, rather than the specific characteristics of one particular example.
Abstraction means, that we can have an idea or a concept that is completely separate from any specific instance.
It is one of the fundamental building blocks of object oriented programming.
For example, when you use cout, you’re actually using the cout object of the class ostream. This streams data to result in standard output.
cout << "Hello!" << endl;
In this example, there is no need to understand how cout will display the text on the user’s screen. The only thing you need to know to be able to use it is the public interface.
Abstraction allows us to write a single bank account class, and then create different objects based on the class, for individual bank accounts, rather than creating a separate class for each bank account.
Abstraction acts as a foundation for the other object orientation fundamentals, such as inheritance and polymorphism.

Encapsulation
Encapsulation
Part of the meaning of the word encapsulation is the idea of “surrounding” an entity, not just to keep what’s inside together, but also to protect it.
In object orientation, encapsulation means more than simply combining attributes and behavior together within a class; it also means restricting access to the inner workings of that class.
The key principle here is that an object only reveals what the other application components require to effectively run the application. All else is kept out of view.
This is called data hiding.
For example, if we take our BankAccount class, we do not want some other part of our program to reach in and change the balance of any object, without going through the deposit() or withdraw() behaviors.
We should hide that attribute, control access to it, so it is accessible only by the object itself. This way, the balance cannot be directly changed from outside of the object and is accessible only using its methods.
This is also known as “black boxing”, which refers to closing the inner working zones of the object, except of the pieces that we want to make public.
This allows us to change attributes and implementation of methods without altering the overall program. For example, we can come back later and change the data type of the balance attribute.
In summary the benefits of encapsulation are: - Control the way data is accessed or modified. - Code is more flexible and easy to change with new requirements. - Change one part of code without affecting other part of code.
Example of Encapsulation
Access Specifiers
Access specifiers are used to set access levels to particular members of the class.
The three levels of access specifiers are public, protected, and private.
graph LR
A["Access Specifiers"] --> B["public"] & C["protected"] &  D["private"]
Public
A public member is accessible from outside the class, and anywhere within the scope of the class object.
#include <iostream>

using namespace std;

class myClass {
public:
    string name;
};

int main() {
    myClass myObj;
    myObj.name="AzatAI";
    cout << myObj.name;
    return 0;
}
AzatAI
Process finished with exit code 0
The name attribute is public; it can be accessed and modified from outside the code.
Access modifiers only need to be declared once; multiple members can follow a single access modifier. Notice the colon (:) that follows the public keyword.
Private
A private member cannot be accessed, or even viewed, from outside the class; it can be accessed only from within the class.
A public member function may be used to access the private members. For example:
#include <iostream>

using namespace std;

class myClass {
public:
    void setName(string x){
        name = x;
    }

private:
    string name;
};

int main() {
    myClass myObj;
    myObj.setName("AzatAI");
//    cout << myObj.name;
    return 0;
}
The name attribute is private and not accessible from the outside.
The public setName() method is used to set the name attribute.
If no access specifier is defined, all members of a class are set to private by default.
We can add another public method in order to get the value of the attribute.
#include <iostream>

using namespace std;

class myClass {
public:
    void setName(string x){
        name = x;
    }

    string getName(){
        return name;
    }
private:
    string name;
};

int main() {
    myClass myObj;
    myObj.setName("AzatAI");
//    cout << myObj.name;
    return 0;
}
The getName() method returns the value of the private name attribute.
Constructors
Constructors
Class constructors are special member functions of a class. They are executed whenever new objects are created within that class.
The constructor’s name is identical to that of the class. It has no return type, not even void.
#include <iostream>
#include <utility>

using namespace std;

class myClass {
private:
    string name;
public:
    myClass() {
        cout << "Hey";
    }

    void setName(string x) {
        name = x;
    }

    string getName(){
        return name;
    }
};

int main(){
    myClass myObj;
    return 0;
}
Now, upon the creation of an object of type myClass, the constructor is automatically called.
Constructors can be very useful for setting initial values for certain member variables.
A default constructor has no parameters. However, when needed, parameters can be added to a constructor. This makes it possible to assign an initial value to an object when it’s created, as shown in the following example:
#include <iostream>
#include <utility>

using namespace std;

class myClass {
private:
    string name;
public:
    myClass(string nm) {
        setName(nm);
    }

    void setName(string x) {
        name = x;
    }

    string getName(){
        return name;
    }
};

int main(){
    myClass myObj("something");
    return 0;
}
When creating an object, you now need to pass the constructor’s parameter, as you would when calling a function.
More on
Separate Files for Classes
Creating a New Class
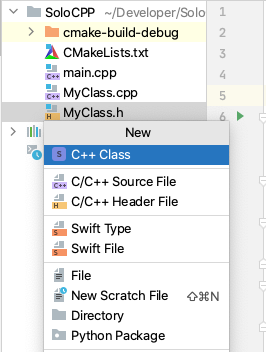
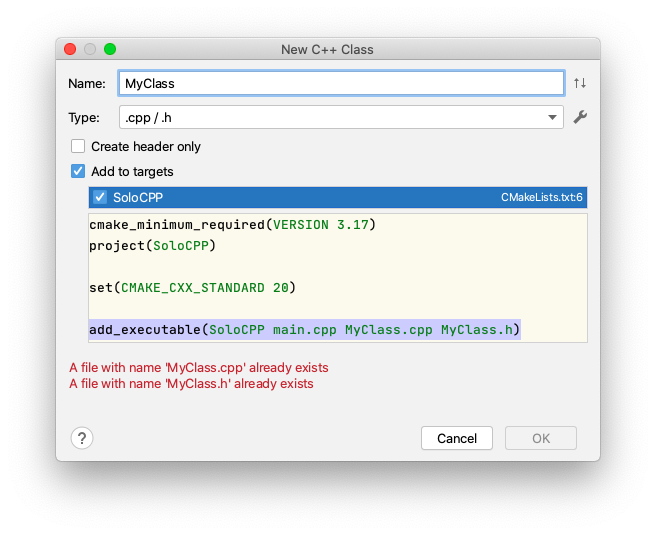
The new files act as templates for our new class. - MyClass.h is the header file. - MyClass.cpp is the source file.
Source & Header
The header file (.h) holds the function declarations (prototypes) and variable declarations. It currently includes a template for our new MyClass class, with one default constructor. MyClass.h
//
// Created by Azat on 8/28/20.
//

#ifndef SOLOCPP_MYCLASS_H
#define SOLOCPP_MYCLASS_H


class MyClass {
public:
    MyClass();

protected:
private:
};


#endif //SOLOCPP_MYCLASS_H
The implementation of the class and its methods go into the source file (.cpp).
Currently it includes just an empty constructor.
//
// Created by Azat on 8/28/20.
//

#include "MyClass.h"

MyClass::MyClass() {

}
Scope Resolution Operator
The double colon in the source file (.cpp) is called the scope resolution operator, and it’s used for the constructor definition:
#include "MyClass.h"

MyClass::MyClass()
{
   //ctor
}
The scope resolution operator is used to define a particular class’ member functions, which have already been declared. Remember that we defined the constructor prototype in the header file.
So, basically, MyClass::MyClass() refers to the MyClass() member function - or, in this case, constructor - of the MyClass class.
to create a function called ‘‘test’’ belonging to a class called ‘‘demo’’:
demo::test()
Source & Header
To use our classes in our main, we need to include the header file.
For example, to use our newly created MyClass in main:
#include <iostream>
#include "MyClass.h"
using namespace std;


int main() {
    MyClass obj;
    return 0;
}
The header declares “what” a class (or whatever is being implemented) will do, while the cpp source file defines “how” it will perform those features.
Destrctors
Destructors
Remember constructors? They’re special member functions that are automatically called when an object is created.
Destructors are special functions, as well. They’re called when an object is destroyed or deleted.
Objects are destroyed when they go out of scope, or whenever the delete expression is applied to a pointer directed at an object of a class.
The name of a destructor will be exactly the same as the class, only prefixed with a tilde (~). A destructor can’t return a value or take any parameters.
class MyClass {
  public:
    ~MyClass() {
     // some code
    }
};
Destructors can be very useful for releasing resources before coming out of the program. This can include closing files, releasing memory, and so on.
For example, let’s declare a destructor for our MyClass class, in its header file MyClass.h:
//
// Created by Azat on 8/28/20.
//

#ifndef SOLOCPP_MYCLASS_H
#define SOLOCPP_MYCLASS_H


class MyClass {
public:
    MyClass();
    ~MyClass();

protected:
private:
};


#endif //SOLOCPP_MYCLASS_H
After declaring the destructor in the header file, we can write the implementation in the source file MyClass.cpp:
//
// Created by Azat on 8/28/20.
//

#include "MyClass.h"
#include <iostream>

using namespace std;

MyClass::MyClass() {
    cout << "Constructor" << endl;
}

MyClass::~MyClass() {
    cout << "Destructor" << endl;
}
-
Since destructors can’t take parameters, they also can’t be overloaded.
-
Each class will have just one destructor.
Defining a destructor is not mandatory; if you don’t need one, you don’t have to define one.
Let’s return to our main.
#include <iostream>
#include "MyClass.h"
using namespace std;


int main() {
    MyClass obj;
    return 0;
}
Constructor
Destructor

Process finished with exit code 0
When the program runs, it first creates the object and calls the constructor. The object is deleted and the destructor is called when the program’s execution is completed.
Remember that we printed “Constructor” from the constructor and “Destructor” from the destructor.
Selection Operator
#ifndef & #define
We created separate header and source files for our class, which resulted in this header file.
//
// Created by Azat on 8/28/20.
//

#ifndef SOLOCPP_MYCLASS_H
#define SOLOCPP_MYCLASS_H


class MyClass {
public:
    MyClass();

    ~MyClass();

protected:
private:
};


#endif //SOLOCPP_MYCLASS_H
ifndef stands for “if not defined”. The first pair of statements tells the program to define the MyClass header file if it has not been defined already.
endif ends the condition.
This prevents a header file from being included more than once within one file.
Member Functions
Let’s create a sample function called myPrint() in our class. MyClass.h
//
// Created by Azat on 8/28/20.
//

#ifndef SOLOCPP_MYCLASS_H
#define SOLOCPP_MYCLASS_H


class MyClass {
public:
    MyClass();

    ~MyClass();

    void myPrint();

protected:
private:
};


#endif //SOLOCPP_MYCLASS_H
MyClass.cpp
//
// Created by Azat on 8/28/20.
//

#include "MyClass.h"
#include <iostream>

using namespace std;

MyClass::MyClass() {
    cout << "Constructor" << endl;
}

MyClass::~MyClass() {
    cout << "Destructor" << endl;
}

void MyClass::myPrint() {
    cout << "Hello" << endl;
}
Since myPrint() is a regular member function, it’s necessary to specify its return type in both the declaration and the definition.
Dot Operator
Next, we’ll create an object of the type MyClass, and call its myPrint() function using the dot (.) operator:
#include <iostream>
#include "MyClass.h"
using namespace std;


int main() {
    MyClass obj;
    obj.myPrint();
    return 0;
}
Constructor
Hello
Destructor

Process finished with exit code 0
Pointers
We can also use a pointer to access the object’s members.
The following pointer points to the obj object:
#include <iostream>
#include "MyClass.h"

using namespace std;


int main() {
    MyClass obj;
    MyClass *ptr = &obj;
    return 0;
}
The type of the pointer is MyClass, as it points to an object of that type.
Selection Operator
The arrow member selection operator (->) is used to access an object’s members with a pointer.
#include <iostream>
#include "MyClass.h"

using namespace std;


int main() {
    MyClass obj;
    MyClass *ptr = &obj;
    ptr->myPrint();
    return 0;
}
Constructor
Hello
Destructor

Process finished with exit code 0
When working with an object, use the dot member selection operator (.). When working with a pointer to the object, use the arrow member selection operator (->).
Const Objects
Constants
A constant is an expression with a fixed value. It cannot be changed while the program is running. Use the const keyword to define a constant variable.
const int x =42;
All constant variables must be initialized at the time of their creation.
Constant Objects
As with the built-in data types, we can make class objects constant by using the const keyword.
const MyClass obj;
All const variables must be initialized when they’re created. In the case of classes, this initialization is done via constructors. If a class is not initialized using a parameterized constructor, a public default constructor must be provided - if no public default constructor is provided, a compiler error will occur.
Once a const class object has been initialized via the constructor, you cannot modify the object’s member variables. This includes both directly making changes to public member variables and calling member functions that set the value of member variables.
When you’ve used const to declare an object, you can’t change its data members during the object’s lifetime.
Only non-const objects can call non-const functions. A constant object can’t call regular functions. Hence, for a constant object to work you need a constant function.
To specify a function as a const member, the const keyword must follow the function prototype, outside of its parameters’ closing parenthesis. For const member functions that are defined outside of the class definition, the const keyword must be used on both the function prototype and definition. For example:
//
// Created by Azat on 8/28/20.
//

#ifndef SOLOCPP_MYCLASS_H
#define SOLOCPP_MYCLASS_H


class MyClass {
public:
    MyClass();

    ~MyClass();

    void myPrint() const;

protected:
private:
};


#endif //SOLOCPP_MYCLASS_H
MyClass.cpp
//
// Created by Azat on 8/28/20.
//

#include "MyClass.h"
#include <iostream>

using namespace std;

MyClass::MyClass() {
    cout << "Constructor" << endl;
}

MyClass::~MyClass() {
    cout << "Destructor" << endl;
}


void MyClass::myPrint() const {
    cout << "Hello" << endl;
}
Now the myPrint() function is a constant member function. As such, it can be called by our constant object:
#include <iostream>
#include "MyClass.h"

using namespace std;


int main() {
    const MyClass obj;
    obj.myPrint();
    return 0;
}
Constructor
Hello
Destructor

Process finished with exit code 0
Attempting to call a regular function from a constant object results in an error.
In addition, a compiler error is generated when any const member function attempts to change a member variable or to call a non-const member function.
Defining constant objects and functions ensures that corresponding data members cannot be unexpectedly modified.
Member Initialazers
Member Initializers
Recall that constants are variables that cannot be changed, and that all const variables must be initialized at time of creation.
C++ provides a handy syntax for initializing members of the class called the member initializer list (also called a constructor initializer).
Consider the following class:
class MyClass {
  public:
   MyClass(int a, int b) {
    regVar = a;
    constVar = b;
   }
  private:
    int regVar;
    const int constVar;
};
This class has two member variables, regVar and constVar. It also has a constructor that takes two parameters, which are used to initialize the member variables. Running this code returns an error, because one of its member variables is a constant, which cannot be assigned a value after declaration.
In cases like this one, a member initialization list can be used to assign values to the member variables.
class MyClass {
 public:
  MyClass(int a, int b)
  : regVar(a), constVar(b)
  {
  }
 private:
  int regVar;
  const int constVar;
};
Note that in the syntax, the initialization list follows the constructor parameters. The list begins with a colon (:), and then lists each variable to be initialized, along with the value for that variable, with a comma to separate them. Use the syntax variable(value) to assign values.
The initialization list eliminates the need to place explicit assignments in the constructor body. Also, the initialization list does not end with a semicolon.
Let’s write the previous example using separate header and source files.
Myclass.h :
//
// Created by Azat on 8/28/20.
//

#ifndef SOLOCPP_MYCLASS_H
#define SOLOCPP_MYCLASS_H


class MyClass {
public:
    MyClass(int a, int b);
protected:
private:
    int regVar;
    const int constVar;
};


#endif //SOLOCPP_MYCLASS_H
Myclass.cpp
//
// Created by Azat on 8/28/20.
//

#include "MyClass.h"
#include <iostream>

using namespace std;

MyClass::MyClass(int a, int b)
        : regVar(a), constVar(b) {
    cout << regVar << endl;
    cout << constVar << endl;
}
The constructor is used to create the object, assigning two parameters to the member variables via the member initialization list.
The member initialization list may be used for regular variables, and must be used for constant variables.
Even in cases in which member variables are not constant, it makes good sense to use the member initializer syntax.
Composition
Composition
In the real world, complex objects are typically built using smaller, simpler objects. For example, a car is assembled using a metal frame, an engine, tires, and a large number of other parts. This process is called composition.
composition состав композиция
|  |
In C++, object composition involves using classes as member variables in other classes.
This sample program demonstrates composition in action. It contains Person and Birthday classes, and each Person will have a Birthday object as its member.
class Birthday {
 public:
  Birthday(int m, int d, int y)
  : month(m), day(d), year(y)
  {
  }
 private:
   int month;
   int day;
   int year;
};
Our Birthday class has three member variables. It also has a constructor that initializes the members using a member initialization list.
The class was declared in a single file for the sake of simplicity. Alternatively, you could use header and source files.
Let’s also add a printDate() function to our Birthday class:
class Birthday {
 public:
  Birthday(int m, int d, int y)
  : month(m), day(d), year(y)
  {
  }
  void printDate()
  {
   cout<<month<<"/"<<day
   <<"/"<<year<<endl;
  }
 private:
  int month;
  int day;
  int year;
};
Next, we can create the Person class, which includes the Birthday class.
#include <string>
#include "Birthday.h"

class Person {
 public:
  Person(string n, Birthday b)
  : name(n),
   bd(b)
  {
  }
 private:
  string name;
  Birthday bd;
};
The Person class has a name and a Birthday member, and a constructor to initialize them. Ensure that the corresponding header files are included.
Now, our Person class has a member of type Birthday:
class Person {
 public:
  Person(string n, Birthday b)
  : name(n),
    bd(b)
  {
  }
 private:
  string name;
  Birthday bd;
};
Composition is used for objects that share a has-a relationship, as in “A Person has a Birthday”.
Let’s add a printInfo() function to our Person class, that prints the data of the object:
class Person {
 public:
  Person(string n, Birthday b)
  : name(n),
  bd(b)
  {
  }
  void printInfo()
  {
   cout << name << endl;
   bd.printDate();
  }
 private:
  string name;
  Birthday bd;
};
Now that we’ve defined our Birthday and Person classes, we can go to our main, create a Birthday object, and then pass it to a Person object.
int main(){
  Birthday bd(2,21,1985);
  Person p ("David",bd);
  p.printInfo();
}
We’ve created a Birthday object for the date of 2/21/1985. Next, we created a Person object and passed the Birthday object to its constructor. Finally, we used the Person object’s printInfo() function to print its data.
In general, composition serves to keep each individual class relatively simple, straightforward, and focused on performing one task. It also enables each sub-object to be self-contained, allowing for reusability (we can use the Birthday class within various other classes).
The Friend Keyword
Friend Functions
Normally, private members of a class cannot be accessed from outside of that class.
However, declaring a non-member function as a friend of a class allows it to access the class’ private members. This is accomplished by including a declaration of this external function within the class, and preceding it with the keyword friend. In the example below, someFunc(), which is not a member function of the class, is a friend of MyClass and can access its private members.
class MyClass {
 public:
  MyClass() {
   regVar = 0;
  }
 private:
  int regVar;

  friend void someFunc(MyClass &obj);
};
Note that when passing an object to the function, we need to pass it by reference, using the & operator.
The function someFunc() is defined as a regular function outside the class. It takes an object of type MyClass as its parameter, and is able to access the private data members of that object.
class MyClass {
 public:
  MyClass() {
   regVar = 0;
  }
 private:
  int regVar;

 friend void someFunc(MyClass &obj);
};

void someFunc(MyClass &obj) {
  obj.regVar = 42;
  cout << obj.regVar;
}
The someFunc() function changes the private member of the object and prints its value.
To make its members accessible, the class has to declare the function as a friend in its definition. You cannot “make” a function a friend to a class without the class “giving away” its friendship to that function.
Now we can create an object in main and call the someFunc() function:
int main(){
  MyClass obj;
  someFunction(obj);
}
someFunc() had the ability to modify the private member of the object and print its value.
Typical use cases of friend functions are operations that are conducted between two different classes accessing private members of both.
You can declare a function friend across any number of classes. Similar to friend functions, you can define a friend class, which has access to the private members of another class.
The This Keyword
This
Every object in C++ has access to its own address through an important pointer called the this pointer.
Inside a member function this may be used to refer to the invoking object. Let’s create a sample class:
class MyClass{
  public:
  	MyClass(int a):var(a){}
  private:
  int var;
}
Friend functions do not have a this pointer, because friends are not members of a class.
The printInfo() method offers three alternatives for printing the member variable of the class.
class myClass{
  public:
  MyClass(int a):var(a){}
  void printInfo(){
    cout << var << endl;
    cout << this->var<<endl;
    cout << (*this).var<<endl;
  }
  private:
  int var;
};
All three alternatives will produce the same result.
this is a pointer to the object, so the arrow selection operator is used to select the member variable.
You may be wondering why it’s necessary to use the this keyword, when you have the option of directly specifying the variable.
The this keyword has an important role in operator overloading, which will be covered in the following lesson.
Operator Overloading
Operator Overloading
Most of the C++ built-in operators can be redefined or overloaded.
Thus, operators can be used with user-defined types as well (for example, allowing you to add two objects together).
This chart shows the operators that can be overloaded.
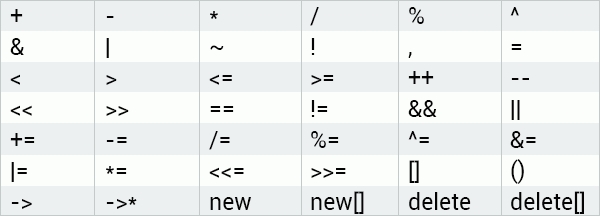
Operators that can’t be overloaded include :: .* . ?: ::
.
*
.
?
:
Let’s declare a sample class to demonstrate operator overloading:
class MyClass{
  public:
  int var;
  MyClass(){}
  MyClass(int a):var(a){}
};
Our class has two constructors and one member variable.
We will be overloading the + operator, to enable adding two objects of our class together.
Overloaded operators are functions, defined by the keyword operator followed by the symbol for the operator being defined.
An overloaded operator is similar to other functions in that it has a return type and a parameter list.
In our example we will be overloading the + operator. It will return an object of our class and take an object of our class as its parameter.
class MyClass{
  public:
  int var;
  MyClass(){}
  MyClass(int a):var(a){}

  MyClass operator +(MyClass &obj){}
}
Now, we need to define what the function does.
We need our + operator to return a new MyClass object with a member variable equal to the sum of the two objects’ member variables.
class MyClass{
  public:
  int var;
  MyClass(){}
  MyClass(int a)
    :var(a){}
  MyClass operator + (MyClass &obj){
    MyClass res;
    res.var = this->var+obj.var;
    return res;
  }
};
Here, we declared a new res object. We then assigned the sum of the member variables of the current object (this) and the parameter object (obj) to the res object’s var member variable. The res object is returned as the result.
This gives us the ability to create objects in main and use the overloaded + operator to add them together.
int main(){
  MyClass obj1(12),obj2(55);
  MyClass res = obj1+obj2;
}
With overloaded operators, you can use any custom logic needed. However, it’s not possible to alter the operators’ precedence, grouping, or number of operands.
Inheritance & Polymorphism
Inheritance
Inheritance
Inheritance is one of the most important concepts of object-oriented programming. Inheritance allows us to define a class based on another class. This facilitates greater ease in creating and maintaining an application.
The class whose properties are inherited by another class is called the Base class. The class which inherits the properties is called the Derived class. For example, the Daughter class (derived) can be inherited from the Mother class (base).
The derived class inherits all feature from the base class, and can have its own additional features.
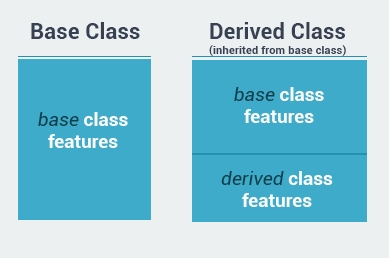
The idea of inheritance implements the is a relationship. For example, mammal IS-A animal, dog IS-A mammal, hence dog IS-A animal as well.
To demonstrate inheritance, let’s create a Mother class and a Daughter class:
#include <iostream>
#include "MyClass.h"

using namespace std;

class Mother{
public:
    Mother();
    void sayHi(){
        cout << "Hi"<<endl;
    }
};
class Dauter : public Mother{
public:
    Dauter(){};
};


int main() {
    MyClass obj(42, 33);
    return 0;
}
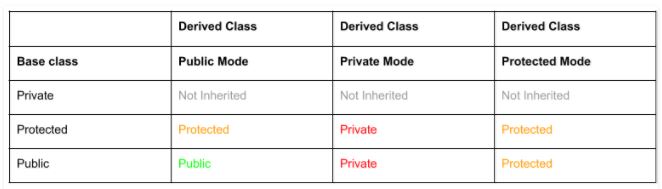
The Base class is specified using a colon and an access specifier: public means, that all public members of the base class are public in the derived class.
In other words, all public members of the Mother class become public members of the Daughter class.
#include <iostream>

using namespace std;

class Mother {
public:
    Mother(){};

    void sayHi() {
        cout << "Hi" << endl;
    }
};

class Dauter : public Mother {
public:
    Dauter() {};
};


int main() {
    Dauter d;
    d.sayHi();
    return 0;
}
Hi

Process finished with exit code 0
A derived class inherits all base class methods with the following exceptions: - Constructors, destructors - Overloaded operators - The friend functions
A class can be derived from multiple classes by specifying the base classes in a comma-separated list. For example: class Daughter: public Mother, public Father
Protected Members
Access Specifiers
Up to this point, we have worked exclusively with public and private access specifiers.
- Public members may be accessed from anywhere outside of the class,
- while access to private members is limited to their class and friend functions.
As we’ve seen previously, it’s a good practice to use public methods to access private class variables.
Protected
There is one more access specifier - protected.
- A protected member variable or function is very similar to a private member, with one difference - it can be accessed in the derived classes.
#include <iostream>

using namespace std;

class Mother {
public:
    Mother(){};

    void sayHi() {
        cout << var << endl;
    }

private:
    int var=0;
protected:
    int someVar; //Now someVar can be accessed by any class that is derived from the Mother class.
};

class Dauter : public Mother {
public:
    Dauter() {};
};


int main() {
    Dauter d;
    d.sayHi();
    return 0;
}
Type of Inheritance
Access specifiers are also used to specify the type of inheritance.
- Public Inheritance: public members of the base class become public members of the derived class and protected members of the base class become protected members of the derived class. A base class’s private members are never accessible directly from a derived class, but can be accessed through calls to the public and protected members of the base class.
- Protected Inheritance: public and protected members of the base class become protected members of the derived class.
- Private Inheritance: public and protected members of the base class become private members of the derived class.
Public inheritance is the most commonly used inheritance type. If no access specifier is used when inheriting classes, the type becomes private by default.
Derived Class Constructors & Destructors
Inheritance
When inheriting classes, the base class’ constructor and destructor are not inherited.

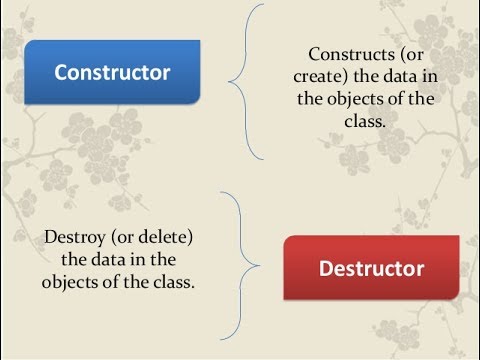
However, they are being called when an object of the derived class is created or deleted.
To further explain this behavior, let’s create a sample class that includes a constructor and a destructor:
#include <iostream>
#include <utility>

using namespace std;

class Mother {
public:
    Mother() {
        cout << "Mother ctor" << endl;
    };

    ~Mother() {
        cout << "Mother dtor" << endl;
    }

};

int main() {
    Mother m;
    return 0;
}
Mother ctor
Mother dtor

Process finished with exit code 0
Next, let’s create a Daughter class, with its own constructor and destructor, and make it a derived class of the Mother:
#include <iostream>
#include <utility>

using namespace std;

class Mother {
public:
    Mother() {
        cout << "Mother ctor" << endl;
    };

    ~Mother() {
        cout << "Mother dtor" << endl;
    }

};

class Dauter: public Mother{
public:
    Dauter(){
        cout << "Dauter ctor"<< endl;
    }
    ~Dauter(){
        cout << "Dauter dtor" << endl;
    }
};

int main() {
    Dauter d;
    return 0;
}
Mother ctor
Dauter ctor
Dauter dtor
Mother dtor

Process finished with exit code 0
Note that the base class’ constructor is called first, and the derived class’ constructor is called next.
Constructors The base class constructor is called first.
Destructors The derived class destructor is called first, and then the base class destructor gets called.
Polymorphism
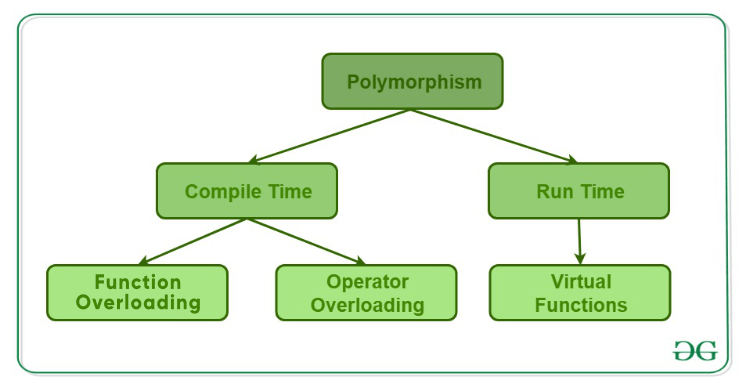
The word polymorphism means “having many forms”.
Typically, polymorphism occurs when there is a hierarchy of classes and they are related by inheritance.
C++ polymorphism means that a call to a member function will cause a different implementation to be executed depending on the type of object that invokes the function.
Simply, polymorphism means that a single function can have a number of different implementations.
Polymorphism can be demonstrated more clearly using an example:
Suppose you want to make a simple game, which includes different enemies: monsters, ninjas, etc. All enemies have one function in common: an attack function. However, they each attack in a different way. In this situation, polymorphism allows for calling the same attack function on different objects, but resulting in different behaviors.
#include <iostream>
#include <utility>

using namespace std;

class Enemy{
protected:
    int attackPower;
public:
    void setAttackPower(int a){
        attackPower=a;
    }
};

int main() {
    return 0;
}
Our Enemy class has a public method called setAttackPower, which sets the protected attackPower member variable.
Our second step is to create classes for two different types of enemies, Ninjas and Monsters.
Both of these new classes inherit from the Enemy class, so each has an attack power. At the same time, each has a specific attack function.
#include <iostream>
#include <utility>

using namespace std;

class Enemy {
protected:
    int attackPower;
public:
    void setAttackPower(int a) {
        attackPower = a;
    }
};

class Ninja : public Enemy {
public:
    void attack() {
        cout << "Ninja Attack!" << endl;
    }
};

class Monster : public Enemy {
public:
    void attack() {
        cout << "Monster Attack!" << endl;
    }
};


int main() {
    Dauter d;
    return 0;
}
As you can see, their individual attack functions differ. Now we can create our Ninja and Monster objects in main.
int main() {
    Ninja n;
    Monster m;
    return 0;
}
Ninja and Monster inherit from Enemy, so all Ninja and Monster objects are Enemy objects. This allows us to do the following:
Enemy *e1 = &n;
Enemy *e2 = &m;
We’ve now created two pointers of type Enemy, pointing them to the Ninja and Monster objects.
Now, we can call the corresponding functions:
#include <iostream>
#include <utility>

using namespace std;

class Enemy {
protected:
    int attackPower;
public:
    void setAttackPower(int a) {
        attackPower = a;
    }
};

class Ninja : public Enemy {
public:
    void attack() {
        cout << "Ninja Attack!" << endl;
    }
};

class Monster : public Enemy {
public:
    void attack() {
        cout << "Monster Attack!" << endl;
    }
};


int main() {
    Ninja n;
    Monster m;

    Enemy *e1 = &n;
    Enemy *e2 = &m;

    e1->setAttackPower(20);
    e2->setAttackPower(40);

    n.attack();
    m.attack();
    return 0;
}
Virtual Functions
Virtual Functions
The previous example demonstrates the use of base class pointers to the derived classes. Why is that useful? Continuing on with our game example, we want every Enemy to have an attack() function.
To be able to call the corresponding attack() function for each of the derived classes using Enemy pointers, we need to declare the base class function as virtual.
Defining a virtual function in the base class, with a corresponding version in a derived class, allows polymorphism to use Enemy pointers to call the derived classes’ functions.
Every derived class will override the attack() function and have a separate implementation:
class Enemy {
public:
    virtual void attack(){

    }
};

class Ninja : public Enemy {
public:
    void attack() {
        cout << "Ninja Attack!" << endl;
    }
};

class Monster : public Enemy {
public:
    void attack() {
        cout << "Monster Attack!" << endl;
    }
};
A virtual function is a base class function that is declared using the keyword virtual.
Now, we can use Enemy pointers to call the attack() function.
#include <iostream>
#include <utility>

using namespace std;

class Enemy {
public:
    virtual void attack() {

    }
};

class Ninja : public Enemy {
public:
    void attack() {
        cout << "Ninja Attack!" << endl;
    }
};

class Monster : public Enemy {
public:
    void attack() {
        cout << "Monster Attack!" << endl;
    }
};


int main() {
    Ninja n;
    Monster m;

    Enemy *e1 = &n;
    Enemy *e2 = &m;

    e1->attack();
    e2->attack();
    return 0;
}
As the attack() function is declared virtual, it works like a template, telling that the derived class might have an attack() function of its own.
Virtual Functions
Our game example serves to demonstrate the concept of polymorphism; we are using Enemy pointers to call the same attack() function, and generating different results.
e1->attack();
e2->attack();
If a function in the base class is virtual, the function’s implementation in the derived class is called according to the actual type of the object referred to, regardless of the declared type of the pointer.
A class that declares or inherits a virtual function is called a polymorphic class.
Abstract Classes
Virtual Functions
Virtual functions can also have their implementation in the base class:
#include <iostream>
#include <utility>

using namespace std;

class Enemy {
public:
    virtual void attack() {
        cout << "Enemy!" << endl;
    }
};

class Ninja : public Enemy {
public:
    void attack() {
        cout << "Ninja Attack!" << endl;
    }
};

class Monster : public Enemy {
public:
    void attack() {
        cout << "Monster Attack!" << endl;
    }
};


int main() {
    Ninja n;
    Monster m;

    Enemy *e1 = &n;
    Enemy *e2 = &m;

    e1->attack();
    e2->attack();
    return 0;
}
Now, when you create an Enemy pointer, and call the attack() function, the compiler will call the function, which corresponds to the object’s type, to which the pointer points:
#include <iostream>
#include <utility>

using namespace std;

class Enemy {
public:
    virtual void attack() {
        cout << "Enemy!" << endl;
    }
};

class Ninja : public Enemy {
public:
    void attack() {
        cout << "Ninja Attack!" << endl;
    }
};

class Monster : public Enemy {
public:
    void attack() {
        cout << "Monster Attack!" << endl;
    }
};


int main() {
    Ninja n;
    Monster m;
    Enemy e;

    Enemy *e1 = &n;
    Enemy *e2 = &m;
    Enemy *e3 = &e;
    e1->attack();
    e2->attack();
    e3->attack();
    return 0;
}
Ninja Attack!
Monster Attack!
Enemy!

Process finished with exit code 0
This is how polymorphism is generally used. You have different classes with a function of the same name, and even the same parameters, but with different implementations.
Pure Virtual Functions
In some situations you’d want to include a virtual function in a base class so that it may be redefined in a derived class to suit the objects of that class, but that there is no meaningful definition you could give for the function in the base class.
The virtual member functions without definition are known as pure virtual functions. They basically specify that the derived classes define that function on their own. The syntax is to replace their definition by =0 (an equal sign and a zero):
class Enemy {
 public:
  virtual void attack() = 0;
};
The = 0 tells the compiler that the function has no body.
A pure virtual function basically defines, that the derived classes will have that function defined on their own.
Every derived class inheriting from a class with a pure virtual function must override that function.
If the pure virtual function is not overridden in the derived class, the code fails to compile and results in an error when you try to instantiate an object of the derived class.
The pure virtual function in the Enemy class must be overridden in its derived classes.
#include <iostream>

using namespace std;

class Enemy{
public:
    virtual void attack()=0;
};

class Ninja: public Enemy{
public:
    void attack(){
        cout << "Ninja!"<<endl;
    }
};
Abstract Classes
You cannot create objects of the base class with a pure virtual function.
These classes are called abstract. They are classes that can only be used as base classes, and thus are allowed to have pure virtual functions.
You might think that an abstract base class is useless, but it isn’t. It can be used to create pointers and take advantage of all its polymorphic abilities.
Ninja n;
Monster m;
Enemy *e1 = &n;
Enemy *e2 = &m;

e1->attack();
e2->attack();
In this example, objects of different but related types are referred to using a unique type of pointer (Enemy*), and the proper member function is called every time, just because they are virtual.
Templates, Exceptions, and Files
Function Templates
Function Templates
Functions and classes help to make programs easier to write, safer, and more maintainable. However, while functions and classes do have all of those advantages, in certain cases they can also be somewhat limited by C++’s requirement that you specify types for all of your parameters.
For example, you might want to write a function that calculates the sum of two numbers, similar to this:
int sum(int a, int b) {
  return a+b;
}
We can now call the function for two integers in our main.
int sum(int a, int b) {
  return a+b;
}

int main () {
  int x=7, y=15;
  cout << sum(x, y) << endl;
}
// Outputs 22
The function works as expected, but is limited solely to integers.
It becomes necessary to write a new function for each new type, such as doubles.
double sum(double a, double b) {
  return a+b;
}
Wouldn’t it be much more efficient to be able to write one version of sum() to work with parameters of any type? Function templates give us the ability to do that! With function templates, the basic idea is to avoid the necessity of specifying an exact type for each variable. Instead, C++ provides us with the capability of defining functions using placeholder types, called template type parameters.
To define a function template, use the keyword template, followed by the template type definition:
template <class T>
We named our template type T, which is a generic data type.
Now we can use our generic data type T in the function:
template <class T>
T sum(T a, T b) {
  return a+b;
}

int main () {
    int x=7, y=15;
    cout << sum(x, y) << endl;
}

// Outputs 22
The same function can be used with other data types, for example doubles:
template <class T>
T sum(T a, T b) {
  return a+b;
}

int main () {
  double x=7.15, y=15.54;
  cout << sum(x, y) << endl;
}
// Outputs 22.69
The compiler automatically calls the function for the corresponding type.
When creating a template type parameter, the keyword typename may be used as an alternative to the keyword class: **template
**. In this context, the keywords are identical, but throughout this course, we'll use the keyword **class**.
Template functions can save a lot of time, because they are written only once, and work with different types.
Template functions reduce code maintenance, because duplicate code is reduced significantly.
Function Templates with Multiple Parameters
Function Templates
Function templates also make it possible to work with multiple generic data types. Define the data types using a comma-separated list.
Let’s create a function that compares arguments of varying data types (an int and a double), and prints the smaller one.
template <class T, class U>
Now we can continue with our function declaration:
template <class T, class U>
T smaller(T a, U b) {
  return (a < b ? a : b);
}

int main () {
  int x=72;
  double y=15.34;
  cout << smaller(x, y) << endl;
}

// Outputs 15
The output converts to an integer, because we specified the function template’s return type to be of the same type as the first parameter (T), which is an integer.
T is short for Type, and is a widely used name for type parameters. It’s not necessary to use T, however; you can declare your type parameters using any identifiers that work for you. The only terms you need to avoid are C++ keywords.
Remember that when you declare a template parameter, you absolutely must use it in your function definition. Otherwise, the compiler will complain!
Class Templates
Class Template
Just as we can define function templates, we can also define class templates, allowing classes to have members that use template parameters as types.
The same syntax is used to define the class template:
template <class T>
  class MyClass{

  };
Just as with function templates, you can define more than one generic data type by using a comma-separated list.
As an example, let’s create a class Pair, that will be holding a pair of values of a generic type.
template <class T>
  class Pair{
    private:
    T first,second;
    public:
    Pair(T a, T b):
    first(a),second(b){

    }
  }
The code above declares a class template Pair, with two private variables of a generic type, and one constructor to initialize the variables.
A specific syntax is required in case you define your member functions outside of your class - for example in a separate source file.
You need to specify the generic type in angle brackets after the class name.
For example, to have a member function bigger() defined outside of the class, the following
template <class T>
class Pair {
 private:
  T first, second;
 public:
  Pair (T a, T b):
   first(a), second(b){
  }
  T bigger();
};

template <class T>
T Pair<T>::bigger() {
  // some code
}
A specific syntax is required in case you define your member functions outside of your class.
To create objects of the template class for different types, specify the data type in angle brackets, as we did when defining the function outside of the class.
Pair <int> obj(11, 22);
cout << obj.bigger();
// Outputs 22
We can use the same class to create an object that stores any other type.
Pair <double> obj(23.43, 5.68);
cout << obj.bigger();
// Outputs 23.43
Template Specialization
Template Specialization
In case of regular class templates, the way the class handles different data types is the same; the same code runs for all data types.
Template specialization allows for the definition of a different implementation of a template when a specific type is passed as a template argument.
For example, we might need to handle the character data type in a different manner than we do numeric data types.
To demonstrate how this works, we can first create a regular template.
template <class T>
class MyClass {
 public:
  MyClass (T x) {
   cout <<x<<" -  not a char"<<endl;
  }
};
As a regular class template, MyClass treats all of the various data types in the same way.
To specify different behavior for the data type char, we would create a template specialization.
template <class T>
class MyClass {
 public:
  MyClass (T x) {
   cout <<x<<" -  not a char"<<endl;
  }
};

template < >
class MyClass<char> {
 public:
  MyClass (char x) {
   cout <<x<<" is a char!"<<endl;
  }
};
First of all, notice that we precede the class name with template<>, including an empty parameter list. This is because all types are known and no template arguments are required for this specialization, but still, it is the specialization of a class template, and thus it requires to be noted as such.
But more important than this prefix, is the <char> specialization parameter after the class template name. This specialization parameter itself identifies the type for which the template class is being specialized (char).
In the example above, the first class is the generic template, while the second is the specialization. If necessary, your specialization can indicate a completely different behavior from the behavior of the generic template.
The next step is to declare objects of different types and check the result:
int main () {
  MyClass<int> ob1(42);
  MyClass<double> ob2(5.47);
  MyClass<char> ob3('s');
}
/* Output:
42 - not a char
5.47 - not a char
s is a char!
*/
As you can see, the generic template worked for int and double. However, our template specialization was invoked for the char data type.
Exception
Exceptions
Problems that occur during program execution are called exceptions.
Throwing Exceptions
C++ exception handling is built upon three keywords: try, catch, and throw.
throw is used to throw an exception when a problem shows up.
int motherAge = 29;
int sonAge = 36;
if (sonAge > motherAge) {
  throw "Wrong age values";
}
The code looks at sonAge and motherAge, and throws an exception if sonAge is found to be the greater of the two.
In the throw statement, the operand determines a type for the exception. This can be any expression. The type of the expression’s result will determine the type of the exception thrown.
Catching Exception
A try block identifies a block of code that will activate specific exceptions. It’s followed by one or more catch blocks. The catch keyword represents a block of code that executes when a particular exception is thrown.
Code that could generate an exception is surrounded with the try/catch block.
You can specify what type of exception you want to catch by the exception declaration that appears in parentheses following the keyword catch.
try {
  int motherAge = 29;
  int sonAge = 36;
  if (sonAge > motherAge) {
   throw 99;
  }
}
catch (int x) {
  cout<<"Wrong age values - Error "<<x;
}
The try block throws the exception, and the catch block then handles it. The error code 99, which is an integer, appears in the throw statement, so it results in an exception of type int.
Multiple catch statements may be listed to handle various exceptions in case multiple exceptions are thrown by the try block.
Exception Handling
Exception handling is particularly useful when dealing with user input.
For example, for a program that requests user input of two numbers, and then outputs their division, be sure that you handle division by zero, in case your user enters 0 as the second number.
int main() {
  int num1;
  cout <<"Enter the first number:";
  cin >> num1;

  int num2;
  cout <<"Enter the second number:";
  cin >> num2;

  if(num2 == 0) {
   throw 0;
  }

  cout <<"Result:"<<num1 / num2;
}
This code throws an exception with the code 0 of type integer.
int main() {
 try {
  int num1;
  cout <<"Enter the first number:";
  cin >> num1;

  int num2;
  cout <<"Enter the second number:";
  cin >> num2;

  if(num2 == 0) {
   throw 0;
  }

  cout <<"Result:"<<num1 / num2;
 }
 catch(int x) {
  cout <<"Division by zero!";
 }
}
This results in the output of "Division by zero!" as an alternative to a program crash, when 0 is entered as the second number.
In our case, we catch exceptions of type integer only. It’s possible to specify that your catch block handles any type of exception thrown in a try block. To accomplish this, add an ellipsis (…) between the parentheses of catch:
try {
  // code
} catch(...) {
  // code to handle exceptions
}
Files
Working With Files
Another useful C++ feature is the ability to read and write to files. That requires the standard C++ library called fstream.
Three new data types are defined in fstream:
- ofstream: Output file stream that creates and writes information to files.
- ifstream: Input file stream that reads information from files.
- fstream: General file stream, with both ofstream and ifstream capabilities that allow it to create, read, and write information to files.
To perform file processing in C++, header files <iostream> and <fstream> must be included in the C++ source file.
#include <iostream>
#include <fstream>
These classes are derived directly or indirectly from the classes istream and ostream. We have already used objects whose types were these classes: cin is an object of class istream and cout is an object of class ostream.
Opening a File
A file must be opened before you can read from it or write to it.
Either the ofstream or fstream object may be used to open a file for writing.
Let’s open a file called “test.txt” and write some content to it:
#include <iostream>
#include <fstream>

using namespace std;


int main(){
    ofstream MyFile;
    MyFile.open("a.txt");
    MyFile<<"Some Text.\n";
   	MyFile.close();
    return 0;
}
The above code creates an ofstream object called MyFile, and uses the open() function to open the “test.txt” file on the file system. As you can see, the same stream output operator is used to write into the file.
If the specified file does not exist, the open function will create it automatically.
Closing a File
#include <iostream>
#include <fstream>

using namespace std;


int main(){
    ofstream MyFile;
    MyFile.open("a.txt");
    MyFile<<"Some Text.\n";
    MyFile.close();
    return 0;
}
working with Files
You can also provide the path to your file using the ofstream objects constructor, instead of calling the open function.
#include <fstream>
using namespace std;

int main() {
  ofstream MyFile("test.txt");

  MyFile << "This is awesome! \n";
  MyFile.close();
}
Under certain circumstances, such as when you don’t have file permissions, the open function can fail. The is_open() member function checks whether the file is open and ready to be accessed.
#include <iostream>
#include <fstream>
using namespace std;

int main() {
  ofstream MyFile("test.txt");

  if (MyFile.is_open()) {
   MyFile << "This is awesome! \n";
  }
  else {
   cout << "Something went wrong";
  }
  MyFile.close();
}
The is_open() member function checks whether the file is open and ready to be accessed.
File Opening Modes
An optional second parameter of the open function defines the mode in which the file is opened. This list shows the supported modes.
| Mode Parameter | Meaning |
|---|---|
ios::app |
Append |
ios:ate |
go to end of file on opening |
ios:binary |
file open in binary mode |
ios::in |
open file for reading only |
ios:out |
open file for writing only |
ios::trunc |
delete the contents of the file if it exists |
| All these flags can be combined using the bitwise operator OR ( | ). |
For example, to open a file in write mode and truncate it, in case it already exists, use the following syntax:
ofstream outfile;
outfile.open("file.dat", ios::out | ios::trunc );
Reading from a File
You can read information from a file using an ifstream or fstream object.
#include <iostream>
#include <fstream>

using namespace std;


int main(){
    string line;
    ifstream MyFile("a.txt");
    while (getline(MyFile,line)){
        cout << line <<'\n';
    }
    MyFile.close();
    return 0;
}
Some Text.
some some text.

Process finished with exit code 0
The getline function reads characters from an input stream and places them into a string.
The example above reads a text file and prints the contents to the screen. Our while loop uses the getline function to read the file line by line.