
Introduction
USE COMMAND BELOW TO CONNECT TO REMOTE HOST
ssh-copy-id -i ~/.ssh/id_rsa.pub [email protected]
Smart buildings, the Internet of Things (IoT), robotics, smart energy, smart cities, human-computer interaction (HCI), cyber-physical systems, 3D printing, advanced vehicular systems
It is revolutionary that you can build a low-level electronics circuit and then install a Linux web server, using only a few short commands, so that the circuit can be controlled over the Internet.
The $ prompt indicates that a regular Linux user is executing a command, and a # prompt indicates that a Linux superuser is executing a command.
Raspberry Pi Basics
Raspberry Pi Hardware
Introduction to the Platform
The RPi models are capable general-purpose computing devices
are also capable physical computing
They are powerful computing devices. For example, the RPi 3 contains a 1.2 GHz ARM Cortex-A53 processor that can perform more than 700 million Whetstone instructions per second (MWIPS).
RPi Zero or Compute Module for deployment)
HATs (Hardware Attached on Top)
Who should Use the RPi
integrating high-level software and low-level electronics is not an easy task.
providing each type of reader with enough Linux, electronics, and software exposure to ensure that you can be productive, regardless of your previous experience level.
When to Use the RPi
The RPi is perfectly placed for the integration of high-level software and low- level electronics in any type of project.Whether you are planning to build an automated home management system, robot, multimedia display, Internet of 6 Part I ■ Raspberry Pi Basics Things (IoT) application, vending machine, or Internet-connected work of inter- active art, the RPi has the processing power to do whatever you can imagine of an embedded device.
When to NOT Use the RPi
The Linux OS was not designed for real-time or predictable processing., the RPi is not an ideal platform for real-time systems applica- tions.
the RPi can be used as the “central intelligence.”
The RPi platform is not ideal for project developments that are likely to be commercialized.
“ … only be used for the purposes of developing for, running or using a Raspberry Pi device.”
RPi Documentation
embedded Linux, software devel- opment, and general electronics,
- The Raspberry Pi Foundation website: www.raspberrypi.org
- ■ The Raspberry Pi Documentation: www.raspberrypi.org/documentation/.
- Broadcom BCM2835 ARM Peripherals Datasheet:
- m The BCM2836 Document
RPi Hardware
At their heart, the RPi boards use the Broadcom BCM2835, BCM2836, and BCM2837 system on a chip (SoC).
The Compute Module 3 contains the guts of a Raspberry Pi 3 (the BCM2837 processor and 1GB RAM) as well as an optional 4GB eMMC Flash device (which is the equivalent of the SD card in the Pi).
The new Compute Module 3+ sports the Broadcom BCM2837B0 chip, albeit clocked at 1.2GHz and with 1GB LPDDR2 SDRAM.
Raspberry Pi Versions
■ If you want to design your own PCB that uses the RPi (or multiple RPi boards), investigate the Compute module
| Family | Model | Form Factor | Ethernet | Wireless | GPIO | Released | Discontinued |
|---|---|---|---|---|---|---|---|
| Raspberry Pi | B | Standard[a] | Yes | No | 26-pin | 2012 | Yes |
| A | No | 2013 | Yes | ||||
| B+ | Yes | 40-pin | 2014 | ||||
| A+ | Compact[b] | No | 2014 | ||||
| Raspberry Pi 2 | B | Standard[a] | Yes | No | 2015 | ||
| Raspberry Pi Zero | Zero | Zero[c] | No | No | 2015 | ||
| W/WH | Yes | 2017 | |||||
| Raspberry Pi 3 | B | Standard[a] | Yes | Yes | 2016 | ||
| A+ | Compact[b] | No | 2018 | ||||
| B+ | Standard[a] | Yes | 2018 | ||||
| Raspberry Pi 4 | B (1 GiB) | Standard[a] | Yes (Gigabit Ethernet) | Yes | 2019[32] | Yes[1] | |
| B (2 GiB) | |||||||
| B (4 GiB) | |||||||
| B (8 GiB) | 2020 |
The Raspberry Pi Hardware
On recent RPi models (A+, B+, 2, 3, and Zero), there are 40 pins in total on this header (2 × 20);
however, not all are available for general-purpose input/outputs (GPIOs). Several of the connections have a fi xed confi guration:
■ 4 pins are allocated to voltage supplies: 3.3 V (up to 50 mA) and to 5 V (up to 300 mA).
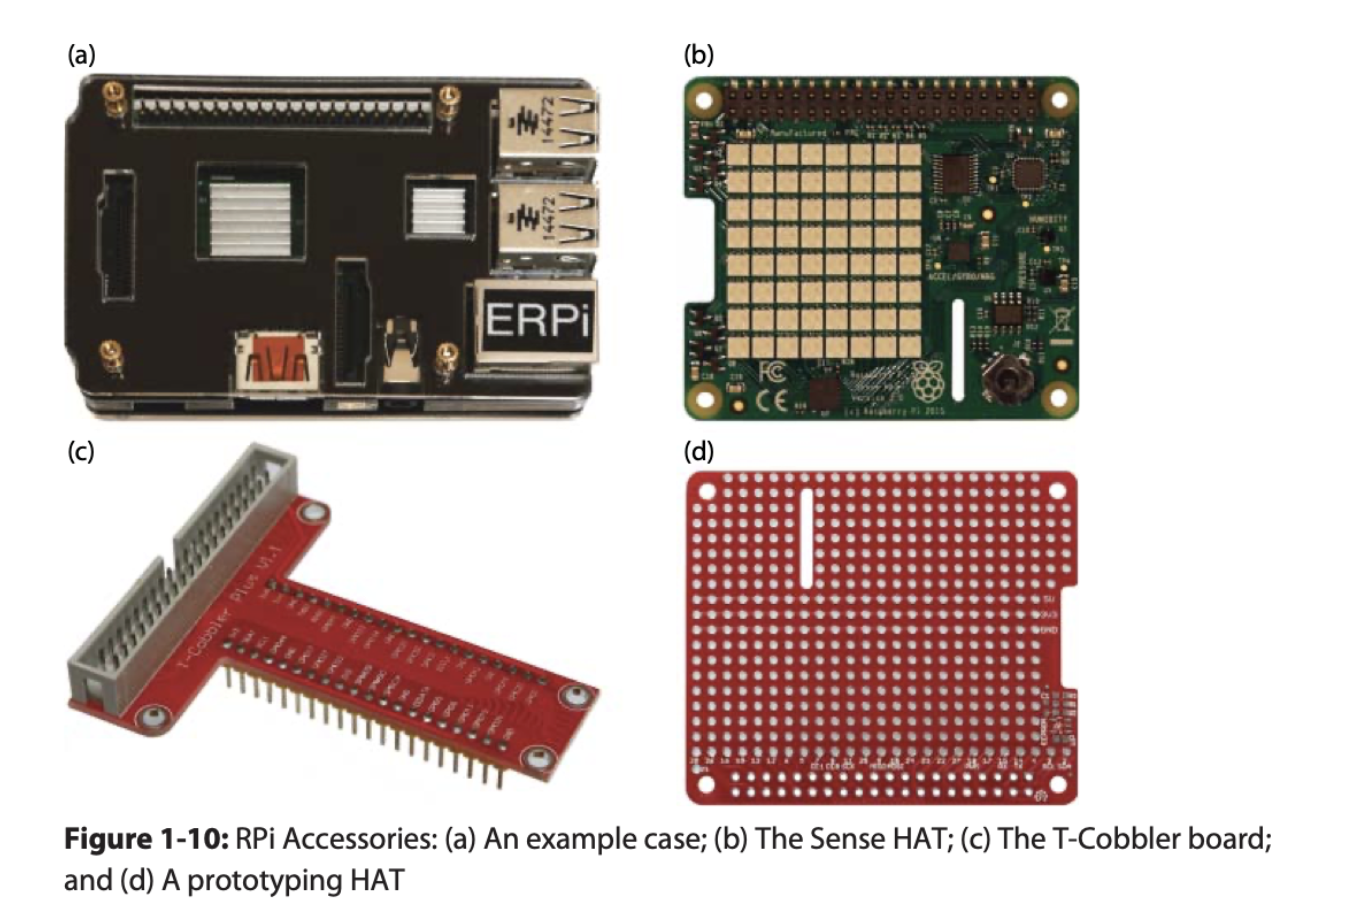
RPi Accessories
Important Accessories
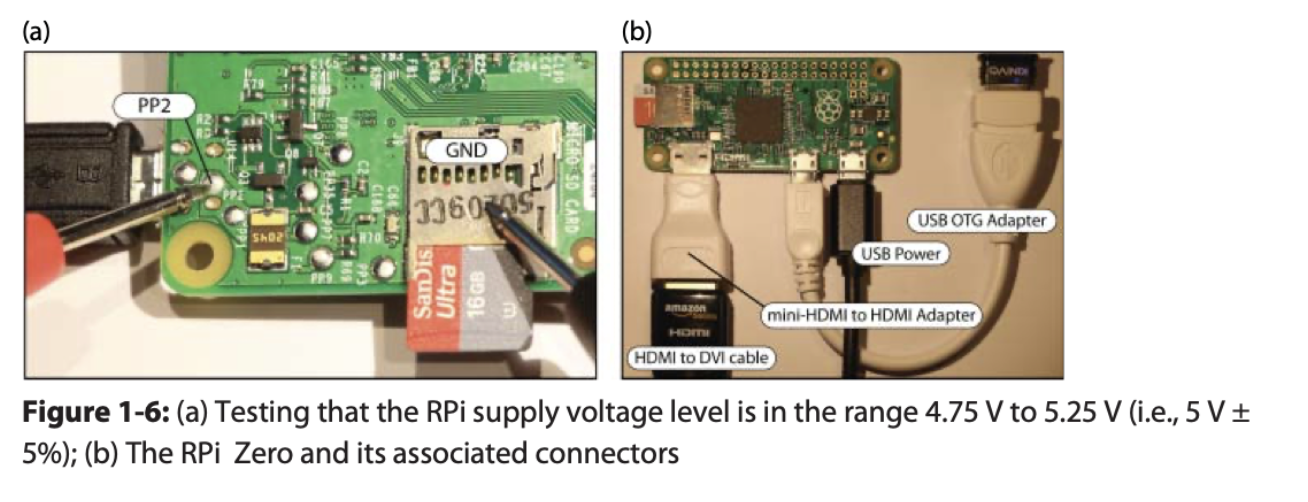
External 5 V Power Supply (for Powering the RPi)
you should measure the voltage level on the RPi. On newer models, you use PP1 or PP2 and GND (or any of the metal shielded components
Micro-SD Card (for Booting an Operating System)
Class 10 or greater,
Ethernet Cable (for Network Connection)
Recommended Accessories
HDMI Cable (for Connection to Monitors/Televisions)
The RPi Zero uses USB On-The-Go (OTG) to connect to USB peripherals.
USB to Serial UART TTL 3.3 V (for Finding Problems)
- The black ground (GND) wire to Pin 6 on the GPIO header, which is the RPi GND pin
- The yellow receive (RXD) wire to Pin 8 (GPIO14) on the GPIO header, which is the UART transmit pin (TXD0)
- The orange transmit (TXD) wire to Pin 10 (GPIO15) on the GPIO header, which is the UART receive pin (RXD0)
The RPi is 3.3 V tolerant but makes a 5 V supply available on the GPIO header pins 2 and 4.
Optional Accessories
- USB Hub (to Connect to Many USB Devices)
Most RPi models have a built-in USB hub
One issue that you have to be aware of with powered USB hubs is that many are back feeding. Back feeding (back powering) is where a USB hub connected to the RPi hub (not the micro-USB power) supplies power back into the RPi through the RPi hub.
- Micro-HDMI to VGA adapters (for VGA Video and Sound)
- Wi-Fi Adapters (for Wireless Networking)
- USB Storage Devices (for Additional Storage)
- USB Webcam (for Capturing Images and Streaming Video)
- USB Keyboard and Mouse (for General-Purpose Computing)
- Cases (for Protecting the RPi)
HATs
HATs (Hardware Attached on Top)
Raspberry Pi Software
Linux on the RPi
high-end server owners might install Red Hat Enterprise, Debian, or OpenSUSE; desktop users might install Ubuntu, Debian, Fedora, or Linux Mint. At the core of all distributions is a common Linux kernel, which was conceived and created by Linus Torvalds in 1991.
In deciding which Linux distribution to use for your embedded system plat- form, it would be sensible to choose one for which the following apply:
- stable and well supported.
- package manager
- The distribution is lean and suited to a low storage footprint.
- There is good community support for your particular device.
- There is device driver support for any desired peripherals.
Linux Distributions for the RPi
Raspbian, Ubuntu, OpenELEC, and Arch Linux
Debian (contraction of Debbie and Ian)
“Debian is the rock upon which Ubuntu is built.”
OpenElec distributions typically use a read-only fi le system (e.g., squashfs) for performance and reliability.
Create a Linux SD Card Image for the RPi
Use the dd disk cloning tool (carefully). First identify the device. It should appear as /dev/mmcblkXp1 or /dev/sddX under Linux, or /dev/rdiskX under Mac OS, where X is a number. You must be certain that X refers to the SD card to which you want to write the image—for example, check that the available capacity of the device (e.g., use cat /proc/partitions) matches the SD card capacity. Then using a terminal window use the dd command with root privileges, where if is the input fi le name and of is the output device name (a block size bs of 1M should work fi ne):
sudo dd bs=1M if=RPi_image_file.img of=/dev/XXX
Connecting to a Network
There are two main ways to connect to and communicate with the RPi over the network: using regular Ethernet or using an Ethernet crossover cable
Regular Ethernet
By default, the RPi is confi gured to request a Dynamic Host Confi guration Protocol (DHCP) IP address.In a home network environment, this service is usually provided by a DHCP server that is running on the integrated modem- fi rewall-router-LAN (or some similar confi guration) that connects the home to an Internet service provider (ISP).
- With a port-scanning tool: Use a tool like nmap
Issue the com- mand nmap -T4 -F 192.168.1.* to scan for devices on a subnet.
- With zero-configuration networking(Zeroconf
Zeroconf is a set of tools for hostname resolution, automatic address assignment, and service discovery.
By default the RPi Raspbian distribution uses an avahi service to support Zeroconf on your network, which makes the hostname visible.
systemctl status avahi-daemon
 avahi-daemon.service - Avahi mDNS/DNS-SD Stack
   Loaded: loaded (/lib/systemd/system/avahi-daemon.service; enabled; vendor preset: enabled)
   Active: active (running) since Thu 2020-08-20 17:09:38 +06; 1 months 2 days ago
 Main PID: 354 (avahi-daemon)
   Status: "avahi-daemon 0.7 starting up."
    Tasks: 2 (limit: 4915)
   CGroup: /system.slice/avahi-daemon.service
           ├─354 avahi-daemon: running [raspberrypi.local]
           └─380 avahi-daemon: chroot helper

Aug 20 17:09:38 raspberrypi avahi-daemon[354]: No service file found in /etc/avahi/services.
Aug 20 17:09:38 raspberrypi avahi-daemon[354]: Network interface enumeration completed.
Aug 20 17:09:38 raspberrypi systemd[1]: Started Avahi mDNS/DNS-SD Stack.
Aug 20 17:09:38 raspberrypi avahi-daemon[354]: Server startup complete. Host name is raspberrypi.local. Local service
Aug 20 17:11:27 raspberrypi avahi-daemon[354]: Joining mDNS multicast group on interface wlan0.IPv6 with address fe80
Aug 20 17:11:27 raspberrypi avahi-daemon[354]: New relevant interface wlan0.IPv6 for mDNS.
- With a USB-to-TTL serial connection:
A fi nal option is to use a USB-to- TTL serial connection to connect to the RPi and type ifconfig to fi nd the IP address. The address is the “inet addr” associated with the eth0 adapter.
Ethernet Crossover Cable
Communicating with the RPi
fter you have networked the RPi, the next thing you might want to do is communicate with the RPi. You can connect to the RPi using either a serial connection over USB-to-TTL or a network connection,
The network connection should be your main focus, because that type of con- nection provides your RPi with full Internet access.
Serial Connection with the USB-to-TTL 3.3V Cable
Serial connections are particularly useful when the RPi is close to your desk- top computer and connected via a USB-to-TTL cable
It can also be used to confi gure wireless networking on an RPi device that does not have wired network support.
A terminal emulator is included by default under Mac OS X (e.g., use a command such as screen /dev/cu.usbserial-XXX 115200)
To connect to the RPi over the USB-to-TTL serial connection, you need the following information:
- Port number:
- Connection speed: By default, you need to enter 115,200 baud to connect to the RPi.
- Other information you may need for other terminal applications: Data bits = 8; Stop bits = 1; Parity = none; and Flow control = XON/XOFF.
On a Linux desktop computer, you can install the screen program and con- nect to the USB-to-TTL device with these commands:
sudo apt-get install screen
screen /dev/cu.usbserial-XXX/ 115200
Connecting Through Secure Shell (SSH)
Secure Shell (SSH) on port 22
- ■ Log in remotely to the RPi and execute commands.
- ■ Transfer fi les to and from the RPi using the SSH File Transfer Protocol (SFTP).
- ■ Forward X11 connections, which allows you to perform virtual network computing.
Transferring Files Using PuTTY/psftp over SHH
It supports serial and SSH connections
Controlling the RPi
Basic Linux Commands
uname -a
Linux raspberrypi 5.4.51-v7l+ #1333 SMP Mon Aug 10 16:51:40 BST 2020 armv7l GNU/Linux
X.Y.Z.
X number changes only rarely
The Y value used to change rarely (every 2 years or so)
The Z value changes regularly.
Next, you could use the passwd command to set a new password for the pi user account:
passwd
more /etc/issue Returns the Linux distribution you are using
╰─❯ more /etc/issue
Raspbian GNU/Linux 10 \n \l
ps -p $$ Returns the shell you are currently using (e.g., bash)
ps -p $$
  PID TTY          TIME CMD
 9026 pts/0    00:00:12 zsh
whoami Returns who you are currently logged in as
uptime Returns how long the system has been running
top Lists all of the processes and programs executing. Press Ctrl+C to close the view.
uptime
 17:13:31 up  2:07,  2 users,  load average: 0.06, 0.04, 0.00
Finally, you can fi nd out specifi c information about your RPi using the hostnamectl application, which can be used to query and change some system settings (e.g., the chassis description and hostname):
╰─❯ hostnamectl
   Static hostname: raspberrypi
         Icon name: computer
        Machine ID: a176c5fc4d874855b8cd38221facb879
           Boot ID: fca3d3ecf7f2468888f6986cf234996c
  Operating System: Raspbian GNU/Linux 10 (buster)
            Kernel: Linux 5.4.51-v7l+
      Architecture: arm
Basic File System Commands
When using Raspbian/Debian and Ubuntu user accounts, you often must prefi x certain commands with the word sudo. That is because sudo is a program that allows users to run programs with the security privileges of the superuser.
Get the calendar cal Display a text-based calendar. cal 04 2016
❯ cal
   September 2020
Su Mo Tu We Th Fr Sa
       1  2  3  4  5
 6  7  8  9 10 11 12
13 14 15 16 17 18 19
20 21 22 23 24 25 26
27 28 29 30
Sometimes it is possible to recover fi les that are lost through accidental deletion if you use the extundelete command immediately after the deletion.
sudo apt install extundelete
Environtment Variables
Environment variables are named values that describe the confi guration of your Linux environment, such as the location of the executable fi les or your default editor.
To get an idea of the environment variables that are set on the RPi, issue an env call, which provides a list of the environment variables on your account. Here, env is called on the Raspbian image:
env
SHELL=/bin/bash
LSCOLORS=Gxfxcxdxbxegedabagacad
COLORTERM=truecolor
PYENV_SHELL=zsh
LESS=-R
TERM_PROGRAM_VERSION=1.49.0
APPLICATION_INSIGHTS_NO_DIAGNOSTIC_CHANNEL=true
LANGUAGE=en_US.UTF-8
SSH_AUTH_SOCK=/tmp/ssh-hKrZ0iJ2qdTw/agent.5273
P9K_TTY=old
SSH_AGENT_PID=5274
NO_AT_BRIDGE=1
PWD=/home/pi/Desktop
PYENV_VIRTUALENV_INIT=1
LOGNAME=pi
XDG_SESSION_TYPE=tty
VSCODE_GIT_ASKPASS_NODE=/home/pi/.vscode-server/bin/e790b931385d72cf5669fcefc51cdf65990efa5d/node
HOME=/home/pi
LANG=en_US.UTF-8
LS_COLORS=rs=0:di=01;34:ln=01;36:mh=00:pi=40;33:so=01;35:do=01;35:bd=40;33;01:cd=40;33;01:or=40;31;01:mi=00:su=37;41:sg=30;43:ca=30;41:tw=30;42:ow=34;42:st=37;44:ex=01;32:*.tar=01;31:*.tgz=01;31:*.arc=01;31:*.arj=01;31:*.taz=01;31:*.lha=01;31:*.lz4=01;31:*.lzh=01;31:*.lzma=01;31:*.tlz=01;31:*.txz=01;31:*.tzo=01;31:*.t7z=01;31:*.zip=01;31:*.z=01;31:*.dz=01;31:*.gz=01;31:*.lrz=01;31:*.lz=01;31:*.lzo=01;31:*.xz=01;31:*.zst=01;31:*.tzst=01;31:*.bz2=01;31:*.bz=01;31:*.tbz=01;31:*.tbz2=01;31:*.tz=01;31:*.deb=01;31:*.rpm=01;31:*.jar=01;31:*.war=01;31:*.ear=01;31:*.sar=01;31:*.rar=01;31:*.alz=01;31:*.ace=01;31:*.zoo=01;31:*.cpio=01;31:*.7z=01;31:*.rz=01;31:*.cab=01;31:*.wim=01;31:*.swm=01;31:*.dwm=01;31:*.esd=01;31:*.jpg=01;35:*.jpeg=01;35:*.mjpg=01;35:*.mjpeg=01;35:*.gif=01;35:*.bmp=01;35:*.pbm=01;35:*.pgm=01;35:*.ppm=01;35:*.tga=01;35:*.xbm=01;35:*.xpm=01;35:*.tif=01;35:*.tiff=01;35:*.png=01;35:*.svg=01;35:*.svgz=01;35:*.mng=01;35:*.pcx=01;35:*.mov=01;35:*.mpg=01;35:*.mpeg=01;35:*.m2v=01;35:*.mkv=01;35:*.webm=01;35:*.ogm=01;35:*.mp4=01;35:*.m4v=01;35:*.mp4v=01;35:*.vob=01;35:*.qt=01;35:*.nuv=01;35:*.wmv=01;35:*.asf=01;35:*.rm=01;35:*.rmvb=01;35:*.flc=01;35:*.avi=01;35:*.fli=01;35:*.flv=01;35:*.gl=01;35:*.dl=01;35:*.xcf=01;35:*.xwd=01;35:*.yuv=01;35:*.cgm=01;35:*.emf=01;35:*.ogv=01;35:*.ogx=01;35:*.aac=00;36:*.au=00;36:*.flac=00;36:*.m4a=00;36:*.mid=00;36:*.midi=00;36:*.mka=00;36:*.mp3=00;36:*.mpc=00;36:*.ogg=00;36:*.ra=00;36:*.wav=00;36:*.oga=00;36:*.opus=00;36:*.spx=00;36:*.xspf=00;36:
GIT_ASKPASS=/home/pi/.vscode-server/bin/e790b931385d72cf5669fcefc51cdf65990efa5d/extensions/git/dist/askpass.sh
SSH_CONNECTION=fe80::4e3:9a7b:8339:f623%wlan0 51234 fe80::8c00:66a3:3097:8770%wlan0 22
XDG_SESSION_CLASS=user
TERM=xterm-256color
ZSH=/home/pi/.oh-my-zsh
USER=pi
VSCODE_GIT_IPC_HANDLE=/run/user/1000/vscode-git-4bdcf29e4c.sock
AMD_ENTRYPOINT=vs/server/remoteExtensionHostProcess
SHLVL=4
PAGER=less
XDG_SESSION_ID=c4
XDG_RUNTIME_DIR=/run/user/1000
SSH_CLIENT=fe80::4e3:9a7b:8339:f623%wlan0 51234 22
VERBOSE_LOGGING=true
P9K_SSH=1
LC_ALL=en_US.UTF-8
VSCODE_GIT_ASKPASS_MAIN=/home/pi/.vscode-server/bin/e790b931385d72cf5669fcefc51cdf65990efa5d/extensions/git/dist/askpass-main.js
PATH=/home/pi/.pyenv/plugins/pyenv-virtualenv/shims:/home/pi/.pyenv/shims:/home/pi/.pyenv/bin:/home/pi/.pyenv/plugins/pyenv-virtualenv/shims:/home/pi/.pyenv/shims:/home/pi/.pyenv/bin:/home/pi/.pyenv/plugins/pyenv-virtualenv/shims:/home/pi/.pyenv/shims:/home/pi/.pyenv/bin:/home/pi/.pyenv/plugins/pyenv-virtualenv/shims:/home/pi/.pyenv/shims:/home/pi/.pyenv/bin:/home/pi/.vscode-server/bin/e790b931385d72cf5669fcefc51cdf65990efa5d/bin:/usr/local/sbin:/usr/local/bin:/usr/sbin:/usr/bin:/sbin:/bin:/usr/local/games:/usr/games
PIPE_LOGGING=true
DBUS_SESSION_BUS_ADDRESS=unix:path=/run/user/1000/bus
MAIL=/var/mail/pi
OLDPWD=/home/pi/Desktop
TERM_PROGRAM=vscode
TEXTDOMAIN=Linux-PAM
VSCODE_IPC_HOOK_CLI=/tmp/vscode-ipc-0bc39906-31b1-4eca-9b80-b3a7554a88c0.sock
_=/usr/bin/env
Basic File Editing
What Time Is It?
╰─❯ date
Tue 22 Sep 2020 05:19:58 PM +06
The answer is that they could not. Unlike a desktop computer, the RPi has no battery backup to ensure that the BIOS settings are retained; in fact, there is no BIOS!
but for the moment, you need a way to set the time, and for that you can use the Network Time Protocol (NTP)
The NTP is a networking protocol for synchronizing clocks between computers. If your RPi has the correct time, that is only because your RPi is obtaining it from your network using an NTP service that is running the board:
After setting the time, you can set your time zone.
sudo dpkg-reconfigure tzdata
─❯ sudo dpkg-reconfigure tzdata

Current default time zone: 'Asia/Almaty'
Local time is now:      Tue Sep 22 17:21:49 +06 2020.
Universal Time is now:  Tue Sep 22 11:21:49 UTC 2020.
If your RPi is not connected to the Internet, you can manually set the date using the timedatectl tool:
sudo timedatectl set-time '2017-1-2 12:13:14'
a battery-backed real-time clock (RTC) can be connected to the RPi to solve that problem.
A package manager is a set of software tools that automate the process of installing, confi guring, upgrading, and removing software packages from the Linux operating system.
buntu and Raspbian/Debian use APT (Advanced Packaging Tool) over DPKG (Debian Package Management System)
-
Is nano installed?
dpkg-query -l | grep nano -
Is a package containing the string nano available?
apt-cache search nano -
Get more information about a package.
apt-cache show nano -
Download a package to the current directory.
apt-get download nano -
Remove a package.
sudo apt remove nano -
Clean up old packages.
sudo apt-get autoremovesudo apt-get clean
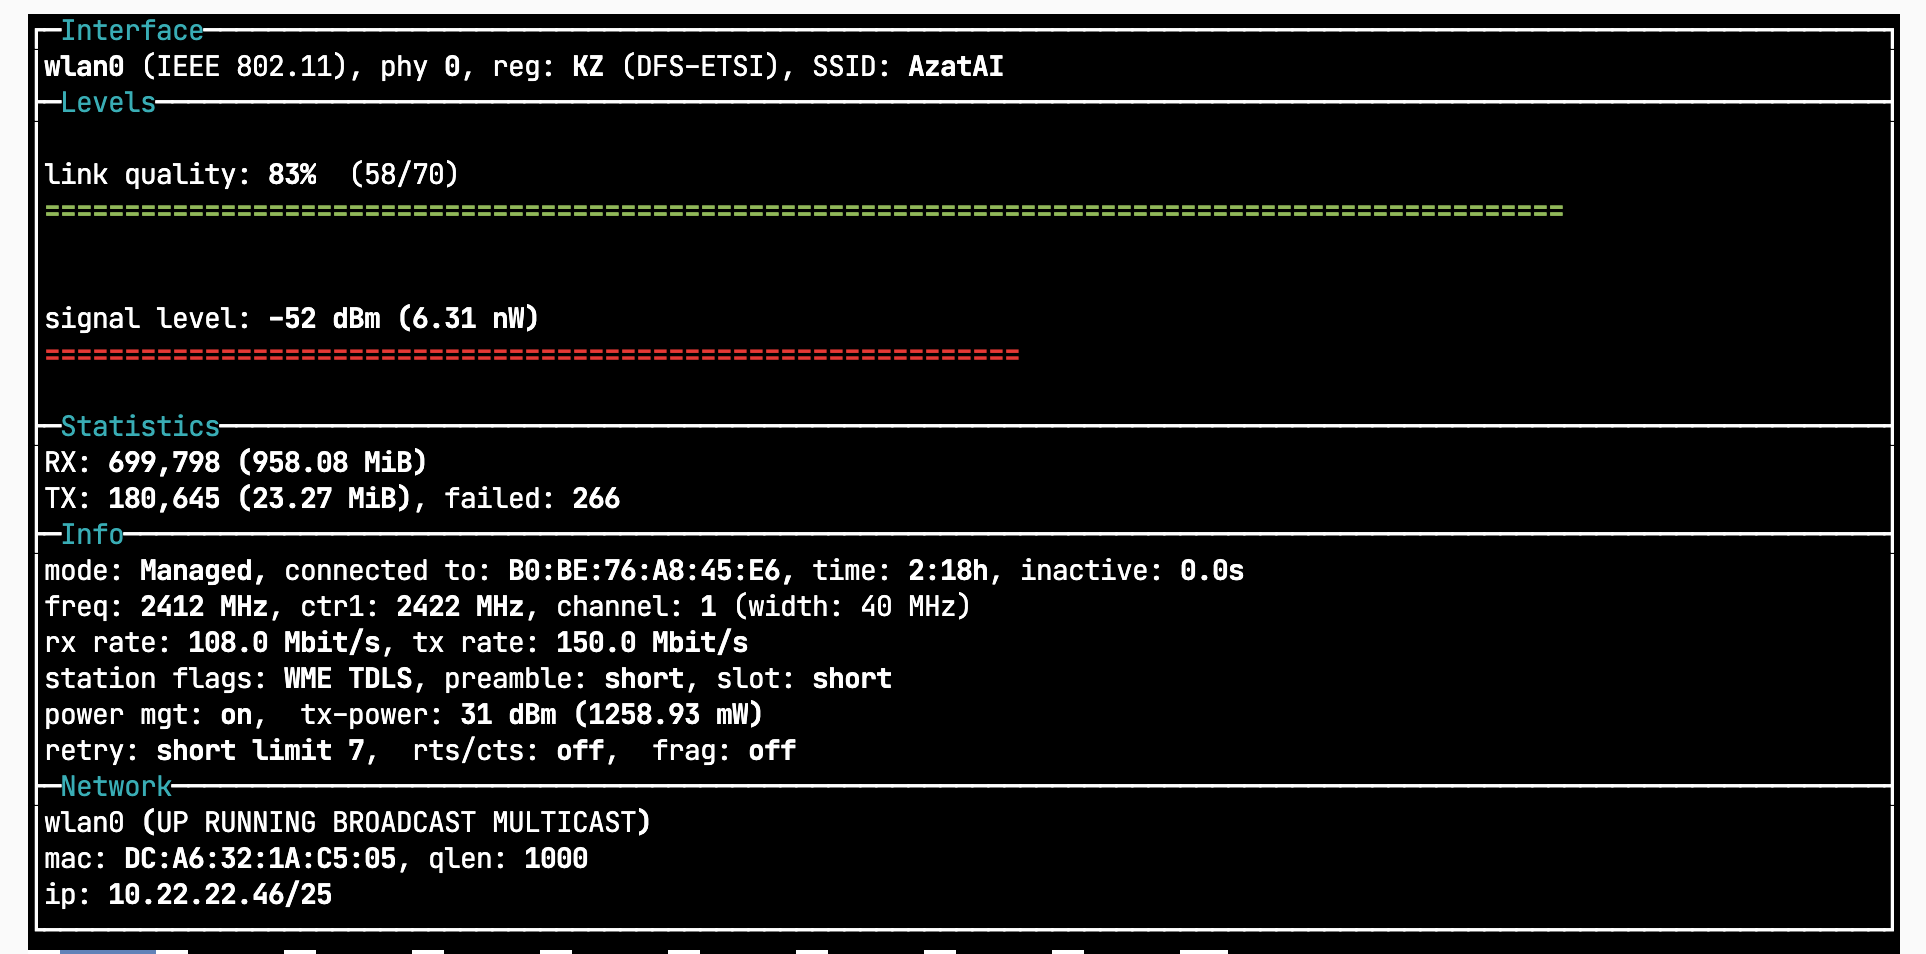
Wavemon is a useful tool that you can use in confi guring Wi-Fi connections
╰─❯ apt-cache search wavemon
wavemon - Wireless Device Monitoring Application
sudo apt install wavemon
Configuring the Raspberry Pi
The Raspberry Pi Configuration Tool
Updating the RPi Software
Video Output
Interacting with the Onboard LEDs
Shutdown and Reboot
Summary
Exploring Embedded Linux Systems
Introducing Embedded Linux
Advantages and Disadvantages of Embedded Linux
Is Linux Open Source and Free?
Booting the RPi
Managing Linux Systems
The Super User
System Administration
Linux Commands
Linux Processes
Other Linux Topics
Using Git for Version Control
A Practice-Bases Introduction
Git Branching
Common Git Commands
Using Desktop Virtualization
Summary
Further Reading
Bibliography
Interfacing Electronics
Analyzing Your Circuits
Digital Multimeter
Oscilloscopes
Basic Circuit Principles
Voltage, Current, Resistance and Ohm’s Law
Voltage Division
Current Division
Implementing RPi Circuits on a Breadboard
Digital Multineters and Breadboards
Example Circuit: Voltage Regulation
Discrete Components
Diodes
Light-Emitting Diodes(LEDs)
Transistors
Optocouplers/Opto-isolators
Switches and Buttons
Logic Gates
Analog-to-Digital Conversion
Sample Rate
Quantization
Operational Amplifiers
Concluding Advice
Summary
Further Reading
Programming on the Raspberry Pi
Introduction
Performance of Languages on the RPi
Setting the RPi CPU Frequency
A First Circuit for Physical Computing
Scripting Languages
Scripting Language Options
Bash
Lua
Perl
Python
Dynamically Compiled Languages
Javascript and Node.js on the RPi
Java on the RPi
C and C++ on the RPi
C and C++ Language Overview
LED Control in C
The C of C++
Overview of Object-Oriented Programming
Objected-Oriented LED Control in C++
Interfacing to the Linux OS
Glibc and Syscall
Improving the Performance of Python
Cython
Extending Python with C/C++
Summary
Further Reading
Biblography
Interfacing, Controlling and Communicating
Interfacing to the Raspberry Pi Input/Outputs
Introduction
General-Purpose Input/Outputs
GPIO Digital Output
GPIO Digital Input
Internal Pull-Up and Pull-Down Resistors
Interfacing to Powered DC Circuits
C++ Control of GPIOs Using sysfs
More C++ Programming
An Enhanced GPIO Class
Memory-Based GPIO Control
GPIO Control Using devmem2
GPIO Control Using C and /dev/mem
Changing the Internal Resistor Configuration
WiringPi
Installing WiringPi
The GPIO Commmand
Programming with WiringPi
Button Press - LED Response